Zabbix is an open-source monitoring software used for collecting metrics from various devices and systems such as networks devices, VM systems, Linux/Windows systems, and cloud services. Zabbix can send notification alerts of issues in any monitored system.
In this tutorial, we shall provide you a guide on installing and configuring Zabbix-5 on CentOS system. Before that let’s take a look at the prerequisites.
Prerequisites
- Apache web server
- PHP with required extensions
- MySQL/ MariaDB server
- Installing Zabbix on CentOS
- Login to Terminal as root and start firing up the commands below.
Step 1 – Install yum-utils
# yum install yum-utils
Step 2 – Download and install the Zabbix 5 repository
Use the following commands:
# rpm -Uvh https://repo.zabbix.com/zabbix/5.0/rhel/7/x86_64/zabbix-release-5.0-1.el7.noarch.rpm
Install Zabbix
# yum install zabbix-server-mysql zabbix-get zabbix-agent -y
Install Zabbix Front end.
Edit file and enable Zabbix-frontend repository
# vi /etc/yum.repos.d/zabbix.repo
[zabbix-frontend]
name=Zabbix Official Repository frontend - $basearch
baseurl=http://repo.zabbix.com/zabbix/5.0/rhel/7/$basearch/frontend
enabled=1 # Change from 0 to 1
gpgcheck=1
gpgkey=file:///etc/pki/rpm-gpg/RPM-GPG-KEY-ZABBIX-A14FE591
Enable Redhat Software Collection
# yum install centos-release-scl -y
Install Zabbix Front end.
# yum install zabbix-web-mysql-scl zabbix-apache-conf-scl
Step 3 – Install MariaDB
# yum install mariadb-server -y
Start the MariaDB service.
# systemctl start mariadb
Enable MariaDB on system boot.
# systemctl enable mariadb
Run the following command to secure MariaDB.
# mysql_secure_installation
Add a new root password and continue. Then it will ask a few questions. Type “Y” to agree to that.
Login to DB server and verify.
# mysql -u root -p
Step 4 – Create a Database for Zabbix
You can choose any name for the database in place of fosslinuxzabbix in the below command:
MariaDB [(none)]> create database zabbix character set utf8 collate utf8_bin;
Create a DB user and grant privileges.
MariaDB [(none)]> create user 'zabbix'@'localhost' identified BY 'redhat';
MariaDB [(none)]> grant all privileges on zabbix.* to zabbix@localhost ;
Flush privileges.
MariaDB [(none)]> flush privileges;
Step 5 – Configure Zabbix
Generally, Zabbix installation package gives SQL file which includes an initial schema and data for the Zabbix server with MySQL.
Change directory and go the Zabbix directory.
# cd /usr/share/doc/zabbix-server-mysql-5.0.30/
Import the MySQL dump file.
# zcat create.sql.gz | mysql -u zabbix -p zabbix
Now modify the Zabbix configuration file with Database details.
# vi /etc/zabbix/zabbix_server.conf
DBHost=localhost
DBName=zabbix
DBUser=zabbix
DBPassword=redhat
Then save and exit the file. Start Zabbix service.
# systemctl start zabbix-server
Enable Zabbix on system boot.
# systemctl enable zabbix-server
Check the Zabbix server is running or not by checking the log file
# tail /var/log/zabbix/zabbix_server.log
Edit file and uncomment and set the right timezone for you.
# cat /etc/opt/rh/rh-php72/php-fpm.d/zabbix.conf | grep php_value
php_value[session.save_handler] = files
php_value[session.save_path] = /var/opt/rh/rh-php72/lib/php/session/
php_value[max_execution_time] = 300
php_value[memory_limit] = 512M
php_value[post_max_size] = 16M
php_value[upload_max_filesize] = 2M
php_value[max_input_time] = 300
php_value[max_input_vars] = 10000
php_value[date.timezone] = Asia/Kolkata
Start/enable the Zabbix server and agent processes:
# systemctl start zabbix-server zabbix-agent httpd rh-php72-php-fpm mariadb
# systemctl enable zabbix-server zabbix-agent httpd rh-php72-php-fpm mariadb
Step 6 – Setup Zabbix
You can access Zabbix using following URL:
http://192.168.2.212/zabbix/
You should see the welcome page.

Click Next.
Check Of Pre-Requisites
Here you Zabbix will check installed PHP, MySQL/MariaDB versions and parameters, etc.

E.g.:- for PHP parameter you have to modify (/etc/php.ini) file. Click Next.
Configure DB Connection

Add database details and click Next. Then you will see server details, and you can add any name for “Name”.
Zabbix Server Details

Click Next. You should see the Database details and server details.
Pre-installation Summary


Click finish to access the login page.
Login Page
The default login name is “Admin” and password is “zabbix”. You will go to the Zabbix Dashboard.
Dash Board

Zabbix Agent collects the data from the client machine and sends them to the Zabbix Server. We will install the Zabbix agent on the Ubuntu machine to monitor it.
Execute following commands to install the agent on Ubuntu 18.04 LTS. As usual, replace the URL with the latest from the official website.
# wget https://repo.zabbix.com/zabbix/5.0/ubuntu/pool/main/z/zabbix-release/zabbix-release_5.0-1%2Bbionic_all.deb
# dpkg -i zabbix-release_5.0-1+bionic_all.deb
# apt update
Install agent.
# apt install zabbix-agent2
Execute following commands to install the agent on Centos 7.
# rpm -Uvh https://repo.zabbix.com/zabbix/5.0/rhel/7/x86_64/zabbix-release-5.0-1.el7.noarch.rpm
# yum install zabbix-agent2
Now modify the agent configuration file.
# vi /etc/zabbix/zabbix_agent2.conf
Modify the following parameters. Replace IP and hostname with yours in the below command:
Server=192.168.2.212
ServerActive=192.168.2.212
Hostname=client-name
Save and exit the file.
Restart Zabbix agent.
# systemctl restart zabbix-agent2
Enable on system boot.
# systemctl enable zabbix-agent2
Step 11 – Add host to monitor on Zabbix server
Go to Configuration > Hosts > Create host.
Create Host
Then you will get the interface as follows:

Add New Host
Add Hostname, Visible Name and agent interface IP. Select a group from the list. In our scenario, we are going to monitor the Centos server. So we will select Linux servers from the list.

Select Group
Select and go to Template Tab. Then click on the select button and select “Template OS Linux” from the list.
Select Template
Click “add,” and it will list linked templates.
Add Template
Click on the update button to update.

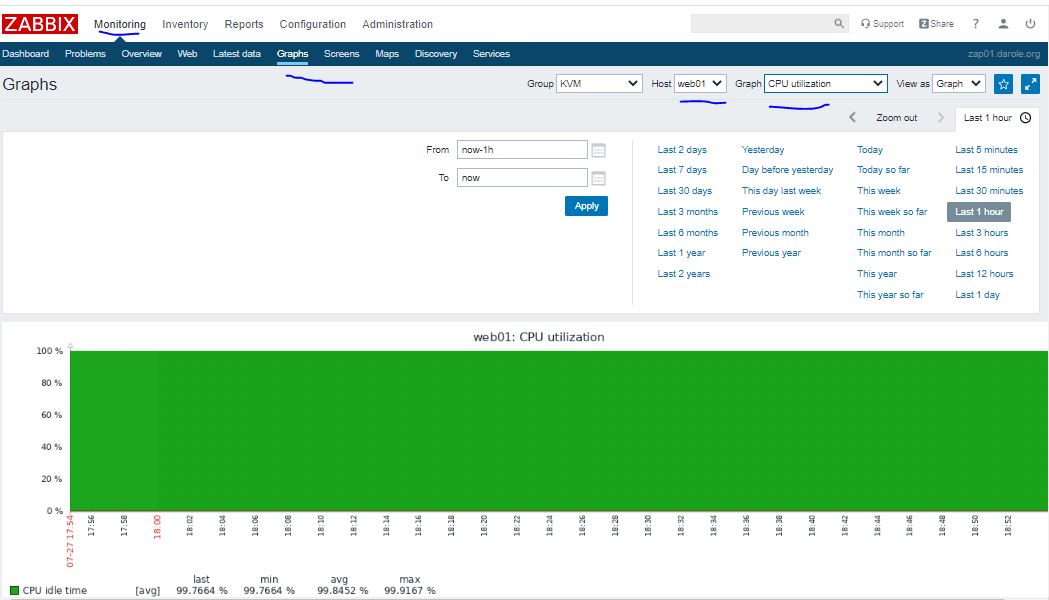
Step 12 – View Graphs
Go to Monitoring > Graphs. You can select needed group, host and graph to display the graphs.
CPU Graph
Memory Usage

Congratulations! You have successfully configured Zabbix server and added hosts to monitor. Let us know your feedback in the comments below.
Now modify the agent configuration file.
# vi /etc/zabbix/zabbix_agent2.conf
Modify the following parameters. Replace IP and hostname with yours in the below command:
Server=192.168.2.212
ServerActive=192.168.2.212
Hostname=client-name
HostMetadata=LinuxServer


5. To check the connectivity from zabbix server to docker client use below command.

- Log in to the Zabbix portal. Go to the Administration tab, then click on Media types.

- Provide the SMTP server hostname, the SMTP HELO domain name and enable the SMTP email address.

- Go to Configuration and enable the action.

- Check again in Administration tab and click on Admin.

- Update the media type email and sent to email id.

No comments:
Post a Comment