Below are the tasks we are going to perform:
Below is my desktop on which we have installed VMware® Workstation 16 Pro:
- Device Name: win01
- Processor: AMD FX(tm)-8350 Eight-Core Processor 4.00 GHz
- Installed RAM: 32.0 GB (31.5 GB usable)
- Edition: Windows 10 Pro
Below are the VMs we are going to create on VMware® Workstation 16 Pro:
1. win01
- Hardware Details: CPU 1, RAM 4GB, Disk 60GB, 2 NIC
- OS Details: Windows 2019 Datacenter Desktop Edition
2. esxi01
- Hardware Details: CPU 2, RAM 14GB, Disk 1000GB, 2 NIC
- OS Details: VMware ESXi 7.0.3
3. esxi02
- Hardware Details: CPU 2, RAM 8GB, Disk 1000GB, 2 NIC
- OS Details: VMware ESXi 7.0.3
4. kub01
- Hardware Details: CPU 2, RAM 4GB, Disk 40GB, 2 NIC
- OS Details: Ubuntu 18
5. kub02
- Hardware Details: CPU 1, RAM 2GB, Disk 40GB, 2 NIC
- OS Details: Ubuntu 18
We are going to create two networks:
- 172.16.0.0/16 for internal communication and optimal speed.
- 192.168.2.0/24 for external communication, such as downloading software from the internet.
Inventory List:
Task 1. Installation and configuration of Windows Server 2019 on VMWare WorkStation VM.
1. We initiated the installation of Windows Server 2019 Datacenter Desktop Edition on win01.2. We renamed the hostname to "win01."
3. We assigned the following IP addresses:
- Internal IP address: 172.16.1.200
- External IP address: 192.168.2.200
4. The firewall was disabled.
5. We configured Active Directory and set the domain to "darole.org."
The Windows Server 2019 installation and configuration on win01 have been completed as outlined above.
Task 2. Add A and MX records to DNS hosted on win01.
We recognize the importance of DNS for the proper functioning of VMware vCenter, and as there are two networks in use, we will configure DNS to optimize communication via the internal network for improved performance. Additionally, we will configure MX records to facilitate sending and receiving emails.
DNS Configuration:
A Record Details:
For Container Orchestration:
- 172.16.1.230 kub01.darole.org
- 172.16.1.231 kub02.darole.org
- 172.16.1.240 dock01.darole.org
For VMs:
- 172.16.1.211 lamp01.darole.org
- 172.16.1.212 zap01.darole.org
- 172.16.1.213 pup01.darole.org
- 172.16.1.221 web01.darole.org
- 172.16.1.222 db01.darole.org
- 172.16.1.223 ans01.darole.org
- 172.16.1.252 jen01.darole.org
- 172.16.1.253 son01.darole.org
For Websites:
- 172.16.1.215 ninom.darole.org
- 172.16.1.216 online-education.darole.org
- 172.16.1.217 organic-farm.darole.org
- 172.16.1.225 jobsearch.darole.org
- 172.16.1.218 travel.darole.org
- 172.16.1.219 jewellery.darole.org
- 172.16.1.220 carvilla.darole.org
For VMware:
- 172.16.1.205 esxi01.darole.org
- 172.16.1.206 esxi02.darole.org
- 172.16.1.207 vcenter01.darole.org
- 172.16.1.200 win01.darole.org
MX Record Details:
- 172.16.1.213 pup01.darole.org
The A and MX records have been added to the DNS hosted on win01 as specified above. This configuration will facilitate communication and email functionality within your network.
Task 3: ESXi Host Deployment and Configuration on VMware WorkStation VM.
VMware ESXi Free is a bare-metal, type-1 hypervisor that allows you to run multiple virtual machines (VMs) on a single physical server or host. It is a basic virtualization platform that is ideal for testing, development, and smaller-scale deployments.
Here are some of the key features and benefits of ESXi Free:
- No licensing cost: ESXi Free is available at no cost, making it an attractive option for organizations with budget constraints.
- Easy to use: ESXi Free has a web-based management interface that makes it easy to create, configure, and manage VMs.
- Scalable: ESXi Free can support up to 8 virtual CPUs and 4GB of RAM per VM.
- Reliable: ESXi Free is a stable and reliable hypervisor that is used by millions of organizations around the world.
However, ESXi Free also has some limitations:
- Limited features: ESXI Free lacks some advanced features like vMotion (live migration), High Availability (HA), and Distributed Resource Scheduler (DRS).
- No official support: VMware does not provide official support for ESXi Free. Users are expected to rely on community forums, documentation, and self-help resources for troubleshooting and support.
A. Installed and Configured ESXi Host VM (VMware WorkStation VM - esxi01):
- CPU: 2 Cores with Virtualization enabled.
- RAM: 14 GB.
- Disks: 1000 GB.
- Internal IP: 172.16.1.205.
- Host Name: esxi01.darole.org.
- OS: VMware ESXi 7.0.3.
B. Installed and Configured ESXi Host VM (VMware WorkStation VM - esxi02):
- CPU: 2 Cores with Virtualization enabled.
- RAM: 8 GB.
- Disks: 1000 GB.
- Internal IP: 172.16.1.206.
- Host Name: esxi02.darole.org.
- OS: VMware ESXi 7.0.3.
After the installation is complete, log in to win01 and check esxi01 and esxi02 through the web console.
Web Console Login Details:
User Name: root
Password: Pass@1234
Ensure that you have access to both esxi01 and esxi02 via the web console using the provided login credentials. This step is essential for further configuration and management of your ESXi hosts.
Task 4. Deploying the vCenter Server Appliance on esxi01.
Before proceeding with the vCenter Server Appliance deployment, ensure that you meet the hardware requirements as specified for a tiny environment:
- Number of vCPUs: 2
- Memory: 12 GB
- Default Storage Size: 1000 GB
Additionally, make sure that DNS resolution is functioning correctly by running the following command on win01:
# nslookup vcenter01.darole.org
Now, follow these steps to deploy the vCenter Server Appliance:
A. Add the VMware-VMvisor-Installer-7.0.0-15843807.x86_64.iso image to win01.
B. Navigate to the `vcsa-ui-installer\win32` directory on the mounted disk and run `installer.exe`.
C. There are two stages in the deployment process:
- Deploy vCenter Server.
- Set up vCenter Server.
D. After completing the installation, log in to the web console for VMware Appliance Management at:
- URL: https://vcenter01.darole.org:5480
- User Name: administrator@vsphere.local
- Password: Pass@1234
E. In the vCenter Server web console, navigate to:
- URL: https://vcenter01.darole.org
- User Name: administrator@vsphere.local
- Password: Pass@1234
F. Create a datacenter named "darole-dc" and a cluster named "my-cluster."
G. Add the ESXi hosts esxi01 and esxi02 to the cluster.
H. To start vCenter, log in to the console of esxi01 and start the VM.
I. To stop vCenter, log in to the appliance configuration and choose the shutdown option.
Important Note: Use the Internat network (172.16.0.0) for vCenter installation. Using the external network (192.168.2.0) for vCenter installation may lead to failures due to network issues.
For more detailed instructions, you can refer to the provided link: [VMware vSphere 7 Installation Setup](https://www.nakivo.com/blog/vmware-vsphere-7-installation-setup/)
Follow these steps carefully to ensure a successful deployment of the vCenter Server Appliance on esxi01.
https://documentation.avaya.com/bundle/UpgradingASP4200_5_0/page/Resetting_the_vCenter_Server_Appliance_Administrator_password.html
Task 5. Virtual networking setup on VCenter01.
Now that the vCenter installation is complete with a single network card using the internet network (172.16.1.0), we will proceed with configuring virtual networking. This involves adding extra network cards to both esxi01 and esxi02 and configuring them for internal and external communication. Follow these steps:
For esxi01:
1.Shutdown esxi01.
2. Add 3 extra network cards to esxi01:
- Ethernet 2: Host-Only (for internal communication)
- Ethernet 3: Bridge (for external communication)
3. Start esxi01.
4. Start the vCenter.
5. Once the vCenter is created, go to esxi01:
- Navigate to "Configure" -> "Networking."
6. Add 2 NICs to the existing internet network (switch0).
7. Create a new switch for the external network and add the pending NIC (bridge).
8. Internal Network IP: 172.16.1.205 (teaming of 3 NICs)
External Network IP: 192.168.2.205 (only 1 NIC)
For esxi02:
1. Shutdown esxi02.
2. Add 3 extra network cards to esxi02:
- Ethernet 2: Host-Only (for internal communication)
- Ethernet 3: Bridge (for external communication)
3. Start esxi02.
4. Start the vCenter.
5. Once the vCenter is created, go to esxi02:
- Navigate to "Configure" -> "Networking."
6. Add 2 NICs to the existing internet network (switch0).7. Create a new switch for the external network and add the pending NIC (bridge).
8. Internal Network IP: 172.16.1.206 (teaming of 3 NICs)
External Network IP: 192.168.2.206 (only 1 NIC)
After the network configuration is complete, check if both esxi hosts are accessible from the external network:
http://192.168.2.205 for esxi01
http://192.168.2.206 for esxi02
Ensure that the networking changes have been applied correctly, and you can access both hosts externally as specified.

Task 6. Create ISO store and VM templates.
Datastore in vCenter:
A datastore in vCenter is a centralized storage location where virtual machines' files are stored. It can be a SAN, NAS, or local storage. Datastores hold virtual machine files, ISO images, templates, and snapshots
Template in vCenter:
A template in vCenter is a master copy of a virtual machine that can be used to create multiple identical VMs quickly. They help maintain consistency and reduce manual setup efforts when creating new VMs.
Now that we have a better understanding of datastores and templates, let's proceed.
1. Uploading ISO Images to ESXi02
As our vCenter is running on ESXi01 and is experiencing high loads, we'll upload ISO images to ESXi02 for better resource distribution. We'll place the ISO files in the /iso folder within the ESXi02 datastore.
The ISO images we're uploading include:
- Ubuntu 20.04
- Rocky 8.7
- Red Hat 8.5
2. Installing Rocky 8.7, We'll create a VM with the following specifications:
- Hostname: rocky
- CPU: 1
- Memory: 2 GB
- Disk: 16 GB
- Internal IP: 172.16.1.228
- External IP: 192.168.2.228
- user root
- password redhat
3. Installing Red Hat 8.5, Another VM with these specifications:
- Hostname: redhat
- CPU: 1
- Memory: 2 GB
- Disk: 16 GB
- Internal IP: 172.16.1.226
- External IP: 192.168.2.226
- user root
- password redhat
Note: To upgrade RHEL 7 to 8 minimum RAM required is 2 GB
4. Installing Ubuntu 20.04, And a third VM with these specifications:
- Hostname: ubuntu
- CPU: 1
- Memory: 2 GB
- Disk: 16 GB
- Internal IP: 172.16.1.227
- External IP: 192.168.2.227
- user vallabh
- password redhat
Converting VMs into Templates
Once the installation and configuration of these VMs are complete, we'll convert them into VM templates. This process essentially captures the VM's current state, allowing us to deploy new VMs based on these templates with ease.
Task 7. Ansible server configuration on ans01.
In this section, we will walk through the configuration steps taken to set up the Ansible server (ans01) and perform various automation tasks within the environment.
Creating and Configuring Ansible Server (ans01):
- Created a new virtual machine "ans01" from the Ubuntu template.
- Changed the hostname of "ans01" to "ans01.darole.org".
- Assigned two IP addresses to "ans01": 172.16.1.223 and 192.168.2.223.
- Disabled the firewall on "ans01."
# hostnamectl set-hostname ans01.darole.org
# cat /etc/netplan/00-installer-config.yaml
network:
version: 2
ethernets:
ens192:
addresses:
- 192.168.2.223/24
gateway4: 192.168.2.1
nameservers:
addresses:
- 192.168.2.1
ens160:
addresses:
- 172.16.1.223/16
# systemctl disable ufw
Updating Ansible Server:
Updated the "ans01" virtual machine from Ubuntu 18 to Ubuntu 20, as the VMware Ansible module requires Ubuntu 20.
# apt update
# apt upgrade -y
# reboot
Note: Ensure you have sufficient disk space
Installation of Ansible and Dependencies:
- Update the package repositories
# apt update
# apt install ansible -y
# apt install python3-pip -y
- Install PyVmomi using pip
# pip install PyVmomi
Note: PyVmomi is the Python SDK for the VMware vSphere API
# apt install python3.9
# update-alternatives --install /usr/bin/python3 python3 /usr/bin/python3.9 1
# update-alternatives --config python3
# python3.9 -m pip install --upgrade pip
Using Ansible Playbooks for VM Creation:
Download the playbook from GitHub Repository
# mkdir /git-data ; cd /git-data
# git clone https://github.com/vdarole/ansible.git
Created virtual machines using the Ansible playbook "create_vm.yml" for automated VM deployment.
Give details of vm name and template name in vars.yml
# cd ansible
# cp hosts /etc/
# cd vmware
# vi vars.yml
---
vcenter_hostname: "vcenter01.darole.org"
vcenter_username: "administrator@vsphere.local"
vcenter_password: "Pass@1234"
vm_name: "<VM Name>"
template_name: "<template Name>"
virtual_machine_datastore: "esxi02-datastore1"
vcenter_validate_certs: false
cluster_name: "my-cluster"
vcenter_datacenter: "darole-dc"
vm_folder: "<VM Name>"
vm_disk_gb: 2
vm_disk_type: "thin"
vm_disk_datastore: "esxi02-datastore1"
vm_disk_scsi_controller: 1
vm_disk_scsi_unit: 1
vm_disk_scsi_type: "paravirtual"
vm_disk_mode: "persistent"
Run the Ansible playbook for VM creation
# ansible-playbook create-vm.yml -i inventory.txt
VM Creation Details:
- VM-Template: rocky
- VM Names: pup01-vm, zap01-vm, jen01-vm, son01-vm
- VM-Template: redhat
- VM Names: lamp01-vm, web01-vm, db01-vm
- VM-Template: ubuntu
- VM Name: dock01-vm, tomp01, tomd01
Migrating VMs:
- Migrated "tomp01" , "zap01-vm" , "jen01-vm" , "dock01-vm","web01-vm" and "db01-vm" from "esxi02" to "esxi01" host.
- Ansible Playbooks used for automation are stored on GitHub repository:
Note: VM name are -vm because we are going to monitor esxi host from zabbix monitoring tool
Go to topics
Task 8. Configuring Hostname and IP Address for New VMs
In our ongoing project to set up an extensive IT infrastructure, we have now successfully created several virtual machines (VMs) in previous task. To make these VMs fully functional, it's essential to assign them proper hostnames and IP addresses. In this blog post, we'll walk you through the configuration steps for four different types of VMs: Rocky, Red Hat, and Ubuntu.
Rocky VMs
1. pup01.darole.org
CentOS VMs are known for their compatibility with the CentOS repository, making software management straightforward.
Set the hostname
# hostnamectl set-hostname pup01.darole.org
# scp vallabh@172.16.1.223:/etc/hosts /etc/
Configure the network interfaces
# sed -i 's/172.16.1.228/172.16.1.213/g' /etc/sysconfig/network-scripts/ifcfg-ens192
# sed -i 's/192.168.2.228/192.168.2.213/g' /etc/sysconfig/network-scripts/ifcfg-ens224
Disable SELinux and the firewall
# sed -i 's/enforcing/disabled/g' /etc/selinux/config
# systemctl disable firewalld
Reboot to apply changes
# reboot
2. zap01.darole.org
Follow the same steps as for pup01.darole.org but with different IP addresses:
Set the hostname
# hostnamectl set-hostname zap01.darole.org
# scp vallabh@172.16.1.223:/etc/hosts /etc/
Configure the network interfaces
# sed -i 's/172.16.1.228/172.16.1.212/g' /etc/sysconfig/network-scripts/ifcfg-ens192
# sed -i 's/192.168.2.228/192.168.2.212/g' /etc/sysconfig/network-scripts/ifcfg-ens224
Disable SELinux and the firewall
# sed -i 's/enforcing/disabled/g' /etc/selinux/config
# systemctl disable firewalld
Reboot to apply changes
# reboot
3. jen01.darole.org
Follow the same steps as for pup01.darole.org but with different IP addresses:
Set the hostname
# hostnamectl set-hostname jen01.darole.org
# scp vallabh@172.16.1.223:/etc/hosts /etc/
Configure the network interfaces
# sed -i 's/172.16.1.228/172.16.1.252/g' /etc/sysconfig/network-scripts/ifcfg-ens192
# sed -i 's/192.168.2.228/192.168.2.252/g' /etc/sysconfig/network-scripts/ifcfg-ens224
Disable SELinux and the firewall
# sed -i 's/enforcing/disabled/g' /etc/selinux/config
# systemctl disable firewalld
Reboot to apply changes
# reboot
4. son01.darole.org
Follow the same steps as for pup01.darole.org but with different IP addresses:
Set the hostname
# hostnamectl set-hostname son01.darole.org
# scp vallabh@172.16.1.223:/etc/hosts /etc/
Configure the network interfaces
# sed -i 's/172.16.1.228/172.16.1.253/g' /etc/sysconfig/network-scripts/ifcfg-ens192
# sed -i 's/192.168.2.228/192.168.2.253/g' /etc/sysconfig/network-scripts/ifcfg-ens224
Disable SELinux and the firewall
# sed -i 's/enforcing/disabled/g' /etc/selinux/config
# systemctl disable firewalld
Reboot to apply changes
# reboot
Red Hat VMs
1. lamp01.darole.org
Red Hat VMs require attaching a Red Hat subscription for package management. Here are the steps for hostname and IP address configuration:
Set the hostname
# hostnamectl set-hostname lamp01.darole.org
# scp vallabh@172.16.1.223:/etc/hosts /etc/
Configure the network interfaces
# sed -i 's/172.16.1.226/172.16.1.211/g' /etc/sysconfig/network-scripts/ifcfg-ens192
# sed -i 's/192.168.2.226/192.168.2.211/g' /etc/sysconfig/network-scripts/ifcfg-ens224
Disable SELinux and the firewall
# sed -i 's/enforcing/disabled/g' /etc/selinux/config
# systemctl disable firewalld
Reboot to apply changes
# reboot
Register with Red Hat and attach a subscription
# subscription-manager register
Registering to: subscription.rhsm.redhat.com:443/subscription
Username: daroleapeksha@gmail.com
Password:
The system has been registered with ID: 76ad51ff-3595-4f71-91e8-6d8dd2105d17
The registered system name is: lamp01.darole.org
2. web01.darole.org
Follow the same steps as for lamp01.darole.org but with different IP addresses and hostname:
Set the hostname
# hostnamectl set-hostname web01.darole.org
# scp vallabh@172.16.1.223:/etc/hosts /etc/
Configure the network interfaces
# sed -i 's/172.16.1.226/172.16.1.221/g' /etc/sysconfig/network-scripts/ifcfg-ens192
# sed -i 's/192.168.2.226/192.168.2.221/g' /etc/sysconfig/network-scripts/ifcfg-ens224
Disable SELinux and the firewall
# sed -i 's/enforcing/disabled/g' /etc/selinux/config
# systemctl disable firewalld
Reboot to apply changes
# reboot
Register with Red Hat and attach a subscription
# subscription-manager register
Registering to: subscription.rhsm.redhat.com:443/subscription
Username: daroleapeksha@gmail.com
Password:
The system has been registered with ID: c1d559a1-4b99-4918-9a9c-923b93df2e2a
The registered system name is: web01.darole.org
3. db01.darole.org
Follow the same steps as for web01.darole.org but with different IP addresses and hostname:
Set the hostname
# hostnamectl set-hostname db01.darole.org
# scp vallabh@172.16.1.223:/etc/hosts /etc/
Configure the network interfaces
# sed -i 's/172.16.1.226/172.16.1.222/g' /etc/sysconfig/network-scripts/ifcfg-ens192
# sed -i 's/192.168.2.226/192.168.2.222/g' /etc/sysconfig/network-scripts/ifcfg-ens224
Disable SELinux and the firewall
# sed -i 's/enforcing/disabled/g' /etc/selinux/config
# systemctl disable firewalld
Reboot to apply changes
# reboot
Register with Red Hat and attach a subscription
# subscription-manager register
Registering to: subscription.rhsm.redhat.com:443/subscription
Username: daroleapeksha@gmail.com
Password:
The system has been registered with ID: cdaa2a9b-fa30-4452-93b5-9cf85f9917e1
The registered system name is: db01.darole.org
Ubuntu VM
1. dock01.darole.org
Ubuntu VMs are known for their ease of use with the Ubuntu repository. Here's how to configure hostname and network:
Set the hostname
# hostnamectl set-hostname dock01.darole.org
# scp vallabh@172.16.1.223:/etc/hosts /etc/
Configure the network interfaces using Netplan
# cat /etc/netplan/00-installer-config.yaml
network:
version: 2
ethernets:
ens192:
addresses:
- 192.168.2.240/24
gateway4: 192.168.2.1
nameservers:
addresses:
- 192.168.2.1
ens160:
addresses:
- 172.16.1.240/16
- 172.16.1.215/16
- 172.16.1.216/16
- 172.16.1.217/16
Disable the Uncomplicated Firewall (UFW)
# systemctl disable ufw
Reboot to apply changes
# reboot
2. kub01.darole.org
Set the hostname
# hostnamectl set-hostname kub01.darole.org
# scp vallabh@172.16.1.223:/etc/hosts /etc/
Configure the network interfaces using Netplan
# cat /etc/netplan/00-installer-config.yaml
network:
version: 2
ethernets:
ens32:
addresses:
- 192.168.2.230/24
gateway4: 192.168.2.1
nameservers:
addresses:
- 192.168.2.1
ens33:
addresses:
- 172.16.1.230/16
Disable the Uncomplicated Firewall (UFW)
# systemctl disable ufw
Disable swap partition in fstab.
# cat /etc/fstab | grep swap
#/swap.img none swap sw 0 0
Reboot to apply changes
# reboot
3. kub02.darole.org
Set the hostname
# hostnamectl set-hostname kub02.darole.org
# scp vallabh@172.16.1.223:/etc/hosts /etc/
Configure the network interfaces using Netplan
# cat /etc/netplan/00-installer-config.yaml
network:
version: 2
ethernets:
ens32:
addresses:
- 192.168.2.231/24
gateway4: 192.168.2.1
nameservers:
addresses:
- 192.168.2.1
ens33:
addresses:
- 172.16.1.231/16
Disable the Uncomplicated Firewall (UFW)
# systemctl disable ufw
Disable swap partition in fstab.
# cat /etc/fstab | grep swap
#/swap.img none swap sw 0 0
Reboot to apply changes
# reboot
4. tomd01.darole.org
Ubuntu VMs are known for their ease of use with the Ubuntu repository. Here's how to configure hostname and network:
Set the hostname
# hostnamectl set-hostname tomd01.darole.org
# scp vallabh@172.16.1.223:/etc/hosts /etc/
Configure the network interfaces using Netplan
# sed -i 's/172.16.1.227/172.16.1.250/g' /etc/netplan/00-installer-config.yaml
# sed -i 's/192.168.2.227/192.168.2.250/g' /etc/netplan/00-installer-config.yaml
# cat /etc/netplan/00-installer-config.yaml
network:
version: 2
ethernets:
ens192:
addresses:
- 192.168.2.250/24
gateway4: 192.168.2.1
nameservers:
addresses:
- 192.168.2.1
ens160:
addresses:
- 172.16.1.250/16
Disable the Uncomplicated Firewall (UFW)
# systemctl disable ufw
Reboot to apply changes
# reboot
5. tomp01.darole.org
Ubuntu VMs are known for their ease of use with the Ubuntu repository. Here's how to configure hostname and network:
Set the hostname
# hostnamectl set-hostname tomp01.darole.org
# scp vallabh@172.16.1.223:/etc/hosts /etc/
Configure the network interfaces using Netplan
# sed -i 's/172.16.1.227/172.16.1.251/g' /etc/netplan/00-installer-config.yaml
# sed -i 's/192.168.2.227/192.168.2.251/g' /etc/netplan/00-installer-config.yaml
# cat /etc/netplan/00-installer-config.yaml
network:
version: 2
ethernets:
ens192:
addresses:
- 192.168.2.251/24
gateway4: 192.168.2.1
nameservers:
addresses:
- 192.168.2.1
ens160:
addresses:
- 172.16.1.251/16
Disable the Uncomplicated Firewall (UFW)
# systemctl disable ufw
Reboot to apply changes
# reboot
Task 9. Puppet server configuration on pup01.
In this report, we document the steps taken to configure the Puppet server (pup01) for centralized management and automation of IT infrastructure tasks within the environment.
1. Installation and Configuration of Puppet Server:
- Installed the Puppet Server repository.
- Installed the Puppet Server package.
- Configured Puppet Server Java arguments.
# dnf -y install https://dl.fedoraproject.org/pub/epel/epel-release-latest-8.noarch.rpm
# dnf -y install https://yum.puppetlabs.com/puppet-release-el-8.noarch.rpm
# dnf install -y puppetserver
# vi /etc/sysconfig/puppetserver
JAVA_ARGS="-Xms512m -Xmx512m Djruby.logger.class=com.puppetlabs.jruby_utils.jruby.Slf4jLogger"
- Configured Puppet Master settings.
# vi /etc/puppetlabs/puppet/puppet.conf
[master]
dns_alt_names = pup01.darole.org
[main]
certname = pup01.darole.org
server = pup01.darole.org
environment = production
runinterval = 1h
- Set up Puppet Certificate Authority (CA).
# /opt/puppetlabs/bin/puppetserver ca setup
- Started and enabled Puppet Server.
# systemctl start puppetserver
# systemctl enable puppetserver
2. Configuration of Puppet Manifests:
- Installed Git for version control.
- Created a directory for Git and navigated to it.
- Cloned the Puppet Git repository.
- Copied Puppet module files to the production environment.
- Copied Puppet manifest files to the production environment.
# yum install git -y
# mkdir /git-data ; cd /git-data
# git clone https://github.com/vdarole/puppet.git
# cp -rf /git-data/puppet/modules/* /etc/puppetlabs/code/environments/production/modules/
# cp -rf /git-data/puppet/manifests/* /etc/puppetlabs/code/environments/production/manifests/
3. Application of Puppet Manifests:
- Puppet manifests were created for various tasks to ensure consistent and automated configuration across servers.
- These manifests include tasks such as banner creation, Bash history setup, user management, package installation, and NTP configuration.
- Servers ans01, zap01, dock01, lamp01, web01, and db01 were configured to connect to the Puppet server (pup01) and apply the relevant manifests.
4. Copied the Puppet agent installation script to all servers.
# scp /git-data/ansible/puppet-agent-install-rhel8.sh zap01:/root
# scp /git-data/ansible/puppet-agent-install-rhel8.sh jen01:/root
# scp /git-data/ansible/puppet-agent-install-rhel8.sh lamp01:/root
# scp /git-data/ansible/puppet-agent-install-rhel8.sh web01:/root
# scp /git-data/ansible/puppet-agent-install-rhel8.sh db01:/root
scp /git-data/ansible/puppet-agent-install-rhel8.sh son01:/root
# scp /git-data/ansible/puppet-agent-install-ubuntu20.sh vallabh@dock01:/tmp
# scp /git-data/ansible/puppet-agent-install-ubuntu20.sh vallabh@kub01:/tmp
# scp /git-data/ansible/puppet-agent-install-ubuntu20.sh vallabh@kub02:/tmp
# scp /git-data/ansible/puppet-agent-install-ubuntu20.sh vallabh@tomd01:/tmp
# scp /git-data/ansible/puppet-agent-install-ubuntu20.sh vallabh@tomp01:/tmp
- Executed the agent installation script on all servers.
# sh puppet-agent-install-ubuntu18.sh ( on ubuntu)
# sh puppet-agent-install-rhel8.sh (on redhat)
# sh puppet-agent-install-rhel8.sh (on rocky)
5. Logged in to the Puppet server to check the agent status and accepted it.
# puppetserver ca list --all
# puppetserver ca sign --all
# puppet agent -t
6. Log in to the ans01 server with the "vallabh" user and execute the command: "puppet agent -t." This will implement the Puppet manifest and create the "ansible" user. Then, log in to the ans01 server using the "ansible" user and execute the following commands:
ansible@ans01:~$ ssh-keygen
ansible@ans01:~$ ssh-copy-id pup01
7. After that, log in to the "pup01" server as the root user and copy the "ansible" authorized key to the following location:
# cp /home/ansible/.ssh/authorized_keys /etc/puppetlabs/code/environments/production/modules/ansfile/files/authorized_keys
Configuring Chrony as an NTP Server
Chrony is a versatile implementation of the Network Time Protocol (NTP). It is used to synchronize the system clock with remote servers or local hardware clocks. Below is a step-by-step guide to installing and configuring Chrony on a Linux system.
1. Install Chrony
[root@pup01 ~]# yum install chrony
2. Configure Chrony
[root@pup01 ~]# cp /etc/chrony.conf /etc/chrony.conf-backup
[root@pup01 ~]# cat /etc/chrony.conf
## File was created using puppet server
server pup01.darole.org iburst
driftfile /var/lib/chrony/drift
makestep 1.0 3
rtcsync
allow 172.16.0.0/16
keyfile /etc/chrony.keys
leapsectz right/UTC
[root@pup01 ~]#
3. Restart and Enable Chrony Service
[root@pup01 ] # systemctl restart chronyd
[root@pup01 ] # systemctl enable chronyd
4. Verify Chrony Service Status
[root@pup01 ] # systemctl status chronyd
5. Test Chrony Configuration
# chronyc sources
- Check synchronization status:
# chronyc tracking
- Manually force synchronization:
6. Logs and Troubleshooting
# tail -f /var/log/chrony/chronyd.log
Task 10. Implement LAMP Application on development (lamp01) and production (web01 and db01).
In this section, we'll implementing the LAMP (Linux, Apache, MySQL, PHP) application stack on "lamp01," "web01," and "db01" servers using Ansible playbooks. Below are the detailed steps for each server:
1. Implementation of LAMP Application on "lamp01" Server:
- During task 6, we had already downloaded the playbook from the Git repository to the Ansible server in the following location:
- Next, move the 'lamp01' folder from '/git-data/ansible' to '/home/ansible'
# mv lamp01 /home/ansible
- After moving the folder, change the ownership of the files
# chown -R ansible.ansible /home/ansible/lamp01
- Run Ansible playbooks for LAMP application implementation on "lamp01" server
# sed -i 's/\t/ /g' webserver-installation.yml
# ansible-playbook webserver-installation.yml -i inventory.txt
# ansible-playbook mariadb-installation.yml -i inventory.txt
# ansible-playbook php-installation.yml -i inventory.txt
# ansible-playbook create-database.yml -e "dbname=jobsearch" -i inventory.txt
# ansible-playbook create-table.yml -i inventory.txt
# ansible-playbook copy-web-pages.yml -i inventory.txt
# ansible-playbook webserver-installation.yml --tags "Restart Webservice" -i inventory.txt
# ansible-playbook data-update.yml -i inventory.txt
- Login to windows server check website. http://lamp01.darole.org/
2. Implementation of LAMP Application on "web01" and "db01" Servers:
- During task 6, we had already downloaded the playbook from the Git repository to the Ansible server in the following location:
# cd /git-data/ansible
- Next, move the 'lamp01' folder from '/git-data/ansible' to '/home/ansible'
# mv web-db /home/ansible
- After moving the folder, change the ownership of the files
# chown -R ansible.ansible /home/ansible/web-db
- Run Ansible playbooks for LAMP application implementation on "web01" and "db01" servers
# ansible-playbook webserver-installation.yml -i inventory.txt
# ansible-playbook mariadb-installation.yml -i inventory.txt
# ansible-playbook php-installation.yml -i inventory.txt
# ansible-playbook create-database.yml -e "dbname=jobsearch" -i inventory.txt
# ansible-playbook create-table.yml -i inventory.txt
# ansible-playbook copy-web-pages.yml -i inventory.txt
# ansible-playbook webserver-installation.yml --tags "Restart Webservice" -i inventory.txt
# ansible-playbook data-update.yml -i inventory.txt
- Login to windows server check website http://web01.darole.org/
Note: The Ansible playbooks automate the deployment of the LAMP application components (Apache, MySQL, PHP) on the designated servers. This ensures a consistent and reliable setup for the web application across the infrastructure
Go to topics
Task 11. Configuring iSCSI Target and Initiator for Shared Storage:
In our environment, shared storage is a crucial component to ensure high availability and redundancy. This post will guide you through the process of setting up an iSCSI target server on Windows (win01) and configuring iSCSI initiators on Linux nodes (web01 and db01) to enable shared storage.
Setting Up iSCSI Target Server on Windows (win01):
1. Open "Server Manager" on win01.
2. Go to "File and Storage Services" and select "iSCSI."
3. On the right-hand side, click "To create an iSCSI virtual disk, start the New iSCSI Virtual Disk Wizard."
Follow these steps to create the iSCSI virtual disk:
4. Choose the D: drive as the location for the iSCSI virtual disk.
5. Set up the virtual disk size, access paths, and any other necessary configurations.
6. Complete the wizard to create the iSCSI virtual disk.
7. Perform same step for E: drive
Installing and Configuring iSCSI Initiators on Linux (web01 and db01)
On both Linux nodes (web01 and db01), follow these steps to install the iSCSI initiator and attach the iSCSI disk:
1. Install the iSCSI initiator utilities:
# yum install iscsi-initiator-utils -y
2. Discover the iSCSI target on win01:
# iscsiadm -m discovery -t st -p 172.16.1.200
3. Log in to the iSCSI target:
# iscsiadm -m node -T iqn.1991-05.com.microsoft:win01-target01-target -p 172.16.1.200 -l
By following these steps, you've successfully set up an iSCSI target server on your Windows server (win01) and configured iSCSI initiators on your Linux nodes (web01 and db01). This shared storage solution is a fundamental building block for achieving high availability and redundancy in your IT infrastructure.
Task 12. Setup and High Availability Cluster using Pacemaker and Corosync on web01 and db01:
In production IT infrastructures, high availability is crucial to ensure uninterrupted services. This guide takes you through the steps of creating a high availability cluster on web01 and db01 using Pacemaker and Corosync.
1. Update the virtual IP address on both servers to make the website accessible:
# echo "172.16.1.225 jobsearch.darole.org" >> /etc/hosts
2. Enable the High Availability repository (HA) on both nodes.
# subscription-manager repos --enable=rhel-8-for-x86_64-highavailability-rpms
3. Install the PCS package, set the password for the hacluster user, and start the service on both nodes.
# dnf install pcs pacemaker fence-agents-all -y
# passwd hacluster
# systemctl start pcsd
Note : Set password to redhat
4A. On db01, install the httpd package since it's not present by default.
# dnf install -y httpd wget php php-fpm php-mysqlnd php-opcache php-gd php-xml php-mbstring
# systemctl start php-fpm
# systemctl enable php-fpm
5A. Create a partition on the iSCSI disk on web01 and copy the website to it.
# lsblk
# pvcreate /dev/sdb
# vgcreate vgweb /dev/sdb
# lvcreate -L +4G -n lvweb vgweb
# mkfs.xfs /dev/vgweb/lvweb
# mount /dev/vgweb/lvweb /mnt # cp -R /var/www/html/* /mnt/
# umount /mnt/
# systemctl disable httpd
4B. On web01, install the mariadb-server package since it's not present by default.
# dnf install -y mariadb-server
5A. Create a partition on the iSCSI disk on db01 and copy the website to it.
# systemctl stop mariadb
# lsblk
# pvcreate /dev/sdc
# vgcreate vgdb /dev/sdc
# lvcreate -L +4G -n lvdb vgdb
# mkfs.xfs /dev/vgdb/lvdb
# mount /dev/vgdb/lvdb /mnt # rsync -avz /var/lib/mysql/ /mnt/
# umount /mnt/
Ensure right ownership
#chown -R mysql:mysql /dev/vgdb/lvdb
Disable mariadb
# systemctl disable mariadb
6. On db01, remount the same iSCSI partition, so that create partition on disk get visible. #iscsiadm -m node -T iqn.1991-05.com.microsoft:win01-target01-target -p 172.16.1.200 -u
#iscsiadm -m node -T iqn.1991-05.com.microsoft:win01-target01-target -p 172.16.1.200 -l
# lsblk
# mount /dev/vgweb/lv01 /var/www/html/
7. Configure the High Availability Cluster on web01:
# pcs host auth web01 db01 -u hacluster -p redhat
# pcs cluster setup web_cluster --start web01 db01
# pcs cluster start
# pcs cluster status
# pcs property set stonith-enabled=false
# pcs property set no-quorum-policy=ignore
# pcs resource create httpd_fs Filesystem device="/dev/vgweb/lvweb" directory="/var/www/html" fstype="xfs" --group apache
# pcs resource create httpd_vip IPaddr2 ip=172.16.1.225 cidr_netmask=24 --group apache
# pcs resource create httpd_ser apache configfile="/etc/httpd/conf/httpd.conf" statusurl="http://172.16.1.225/" --group apache
#pcs resource create mysql_service mariadb enable_creation=true --group mariadb
#pcs resource create mysql_service systemd:mariadb --group mariadb
# pcs resource create mariadb_vip IPaddr2 ip=172.16.1.226 cidr_netmask=24 op monitor interval=30s --group mariadb
Tell Pacemaker preferred node (location constraints)
# pcs constraint location apache prefers web01=INFINITY
# pcs constraint location mariadb prefers db01=INFINITY
# pcs property set stonith-enabled=false
# pcs cluster status
# pcs status
# pcs resource show
8. On db01, allow root@jobsearch.darole.org to access the database.
# mysql -u root -p
MariaDB > use jobsearch;
MariaDB [jobsearch]> GRANT ALL ON jobsearch.* to 'root'@'172.16.1.226' IDENTIFIED BY 'redhat';
MariaDB [jobsearch]> GRANT ALL ON jobsearch.* to 'root'@'web01.darole.org' IDENTIFIED BY 'redhat';
MariaDB [jobsearch]> GRANT ALL ON jobsearch.* to 'root'@'db01.darole.org' IDENTIFIED BY 'redhat';
Change server name in connection.php file from db01.darole.org to jobsearch.darole.org on web server
# cat /var/www/hmtl/connection.php
#$server_name="db01.darole.org";
$server_name="jobsearch.darole.org";
By following these steps, you've successfully set up a high availability cluster on web01 and db01, ensuring uninterrupted services for your website at http://jobsearch.darole.org/.
Go to topics
Task 13. Setting Up Docker Server and Containers on dock01
Docker is a versatile platform that simplifies the deployment of applications, allowing them to run consistently across different environments. In this post, we will walk you through the installation of Docker on your server, "dock01," and demonstrate how to create Docker containers for hosting various web applications.
Docker Installation
# apt update
# apt install apt-transport-https ca-certificates curl software-properties-common
# curl -fsSL https://download.docker.com/linux/ubuntu/gpg | sudo apt-key add -
# add-apt-repository "deb [arch=amd64] https://download.docker.com/linux/ubuntu bionic stable"
# sudo apt update
# apt-cache policy docker-ce
# apt install docker-ce
Download the website template from git hub.
# mkdir /git-data ; cd /git-data
# git clone https://github.com/vdarole/web-temp.git
Docker Cleanup
D. Docker Cleanup:
Once we're done experimenting with our containers, it's essential to perform some cleanup. We can remove all Docker containers and images to keep our system clean.
# docker container rm `docker container ls -a -q` -f
# docker image rm `docker images -q` -f
To automate this process, we've created a simple script for cleanup:
# cat /root/delete-docker.sh
docker container rm `docker container ls -a -q` -f
docker image rm `docker images -q` -f
# crontab -l | grep -v "#"
@reboot /root/delete-docker.sh
root@dock01:~#
Note: There are 2 ways of Volume mounting Container <-> Container and Host <-> Container in the above example we will using Host <-> Container
- "-v /git-data/web-temp/Education/:/var/www/html": Mounts a volume from your host system into the container, allowing the container to access the files in that directory.
- "-p 172.16.1.216:80:80": Maps port 80 of the host to port 80 of the container.
Task 14. Deploy Kubernetes on kub01 and kub02.
In this blog, we'll walk you through installing Kubernetes on two servers (kub01 and kub02) and deploying an NGINX web server using a NodePort service type.
1. Enable iptables Bridged Traffic on all the Nodes
# cat <<EOF | sudo tee /etc/modules-load.d/k8s.conf
overlay
br_netfilter
EOF
# sudo modprobe overlay
# sudo modprobe br_netfilter
# cat <<EOF | sudo tee /etc/sysctl.d/k8s.conf
net.bridge.bridge-nf-call-iptables = 1
net.bridge.bridge-nf-call-ip6tables = 1
net.ipv4.ip_forward = 1
EOF
# sudo sysctl --system
2. Install CRI-O Runtime On All The Nodes
# cat <<EOF | sudo tee /etc/modules-load.d/crio.conf
overlay
br_netfilter
EOF
# cat <<EOF | sudo tee /etc/sysctl.d/99-kubernetes-cri.conf
net.bridge.bridge-nf-call-iptables = 1
net.ipv4.ip_forward = 1
net.bridge.bridge-nf-call-ip6tables = 1
EOF
# sudo modprobe overlay
# sudo modprobe br_netfilter
# cat <<EOF | sudo tee /etc/sysctl.d/99-kubernetes-cri.conf
net.bridge.bridge-nf-call-iptables = 1
net.ipv4.ip_forward = 1
net.bridge.bridge-nf-call-ip6tables = 1
EOF
# sudo sysctl --system
# export OS="xUbuntu_20.04"
# export VERSION="1.28"
# cat <<EOF | sudo tee /etc/apt/sources.list.d/devel:kubic:libcontainers:stable.list
deb https://download.opensuse.org/repositories/devel:/kubic:/libcontainers:/stable/$OS/ /
EOF
# cat <<EOF | sudo tee /etc/apt/sources.list.d/devel:kubic:libcontainers:stable:cri-o:$VERSION.list
deb http://download.opensuse.org/repositories/devel:/kubic:/libcontainers:/stable:/cri-o:/$VERSION/$OS/ /
EOF
# curl -L https://download.opensuse.org/repositories/devel:kubic:libcontainers:stable:cri-o:$VERSION/$OS/Release.key | sudo apt-key --keyring /etc/apt/trusted.gpg.d/libcontainers.gpg add -
# curl -L https://download.opensuse.org/repositories/devel:/kubic:/libcontainers:/stable/$OS/Release.key | sudo apt-key --keyring /etc/apt/trusted.gpg.d/libcontainers.gpg add -
# sudo apt-get update
# sudo apt-get install cri-o cri-o-runc cri-tools -y
# sudo systemctl daemon-reload
# sudo systemctl enable crio --now
3. Install Kubeadm & Kubelet & Kubectl on all Nodes
# sudo mkdir -m 755 /etc/apt/keyrings
# sudo apt-get update
# sudo apt-get install -y apt-transport-https ca-certificates curl gpg
# sudo curl -fsSL https://pkgs.k8s.io/core:/stable:/v1.28/deb/Release.key | sudo gpg --dearmor -o /etc/apt/keyrings/kubernetes-apt-keyring.gpg
# echo 'deb [signed-by=/etc/apt/keyrings/kubernetes-apt-keyring.gpg] https://pkgs.k8s.io/core:/stable:/v1.28/deb/ /' | sudo tee /etc/apt/sources.list.d/kubernetes.list
# sudo apt-get update -y
# sudo apt-get install -y kubelet kubeadm kubectl
# sudo apt-mark hold kubelet kubeadm kubectl
# sudo apt-get install -y jq
local_ip="$(ip --json a s | jq -r '.[] | if .ifname == "ens33" then .addr_info[] | if .family == "inet" then .local else empty end else empty end')"
# cat > /etc/default/kubelet << EOF
KUBELET_EXTRA_ARGS=--node-ip=$local_ip
EOF
4. Initialize Kubeadm On Master Node To Setup Control Plane
# export IPADDR="172.16.1.230"
# export NODENAME=$(hostname -s)
# export POD_CIDR="10.1.0.0/16"
# sudo kubeadm init --apiserver-advertise-address=$IPADDR --apiserver-cert-extra-sans=$IPADDR --pod-network-cidr=$POD_CIDR --node-name $NODENAME --ignore-preflight-errors Swap
5. Test cluster access
# mkdir -p $HOME/.kube
# sudo cp -i /etc/kubernetes/admin.conf $HOME/.kube/config
# sudo chown $(id -u):$(id -g) $HOME/.kube/config
# kubectl get po -n kube-system
# kubectl cluster-info
6. Install Calico Network Plugin for Pod Networking
# kubectl apply -f https://raw.githubusercontent.com/projectcalico/calico/v3.25.1/manifests/calico.yaml
# kubeadm token create --print-join-command
# kubectl get nodes
Example output,
root@master-node:/home/vagrant# kubectl get nodes
NAME STATUS ROLES AGE VERSION
master-node Ready control-plane 14m v1.27.2
worker-node01 Ready <none> 2m13s v1.27.2
Go to topics
Task 15. Configuring Postfix, Dovecot, and SquirrelMail on pup01 Server:
Configuring a mail server involves setting up Postfix for sending and receiving emails, Dovecot for email retrieval (IMAP and POP3), and SquirrelMail as a webmail interface. Here's a step-by-step guide for setting up these components on the "pup01" server:
A. Update MX Record in Win01 DNS Server:
Update the MX record in your Windows Server 2019 DNS configuration to point to the IP address of your "pup01" server. This step ensures that your server is configured to receive emails.
B. Postfix Configuration:
Edit the Postfix main configuration file:
# dnf install postfix
# vi /etc/postfix/main.cf
Modify the following settings:
myhostname = pup01.darole.org ## Add Line
mydomain = darole.org ## Add Line
myorigin = $mydomain ## Uncommit
inet_interfaces = all ## Uncommit
# inet_interfaces = localhost ## commit
# mydestination = $myhostname, localhost.$mydomain, localhost ## commit
mydestination = $myhostname, localhost.$mydomain, localhost, $mydomain ## Uncommit
mynetworks = 172.16.0.0/16, 127.0.0.0/8 ## Uncommit and update IP
home_mailbox = Maildir/ ## Uncommit
Restart Postfix and enable it to start on boot:
# systemctl restart postfix
# systemctl enable postfix
C. Dovecot Configuration:
Install Dovecot and configure protocols, mailbox location, and authentication mechanisms:
Install Dovecot Package
# yum install -y dovecot
To Configure Dovecot we need to edit multiple configuration files.
Edit file /etc/dovecot/dovecot.conf file
# vi /etc/dovecot/dovecot.conf
protocols = imap pop3 lmtp ## uncomment ##
Edit file /etc/dovecot/conf.d/10-mail.conf file
# vi /etc/dovecot/conf.d/10-mail.conf
mail_location = maildir:~/Maildir ## uncomment ##
Edit /etc/dovecot/conf.d/10-auth.conf
# vi /etc/dovecot/conf.d/10-auth.conf
disable_plaintext_auth = yes ## uncomment ##
auth_mechanisms = plain login ## Add the word: "login" ##
Edit file /etc/dovecot/conf.d/10-master.conf,
# vi /etc/dovecot/conf.d/10-master.conf
unix_listener auth-userdb {
#mode = 0600
user = postfix ## Line 102 - Uncomment and add "postfix"
group = postfix ## Line 103 - Uncomment and add "postfix"
}
Start and enable Dovecot service:
# systemctl start dovecot
# systemctl enable dovecot
D. SquirrelMail Installation and Configuration:
Install SquirrelMail from the Remi repository:
# wget https://www.squirrelmail.org/countdl.php?fileurl=http%3A%2F%2Fprdownloads.sourceforge.net%2Fsquirrelmail%2Fsquirrelmail-webmail-1.4.22.tar.gz
# gunzip countdl.php\?fileurl\=http\:%2F%2Fprdownloads.sourceforge.net%2Fsquirrelmail%2Fsquirrelmail-webmail-1.4.22.tar.gz
# mv countdl.php\?fileurl\=http\:%2F%2Fprdownloads.sourceforge.net%2Fsquirrelmail%2Fsquirrelmail-webmail-1.4.22.tar squirrelmail-webmail-1.4.22.tar
# tar -xvf squirrelmail-webmail-1.4.22.tar
# dnf install -y httpd php php-cli php-common
# mv squirrelmail-webmail-1.4.22 /var/www/html/webmail
# cd /var/www/html/webmail/config
# mkdir /var/www/html/webmail/attach
# chown apache:apache -R /var/www/html/
Navigate to SquirrelMail configuration directory and run configuration script:
# cd /var/www/html/webmail/config/
# ./conf.pl
Create the below file and folder copy the data
mkdir /var/local/squirrelmail/
mkdir /var/local/squirrelmail/attach
cp -r /var/www/html/webmail/data/ /var/local/squirrelmail/
chown -R apache.apache /var/local/squirrelmail/
Add squirrelmail configuration is apache config file:
# vi /etc/httpd/conf/httpd.conf
Alias /webmail /var/www/html/webmail
<Directory "/var/www/html/webmail">
Options Indexes FollowSymLinks
RewriteEngine On
AllowOverride All
DirectoryIndex index.php
Order allow,deny
Allow from all
</Directory>
Restart and enable Apache service.
# systemctl restart httpd
# systemctl enable httpd
Open Web Browser and type the below address
http://pup01.darole.org/webmail/src/login.php
Go to topics
Task 16. Zabbix monitoring deployment on zap01 with client auto-discovery.
Zabbix is a popular open-source monitoring solution used to track various metrics and performance data of IT infrastructure components. Below are the steps taken to deploy Zabbix monitoring using Ansible on the "zap01" server.
Running Ansible Playbooks for Zabbix Monitoring Deployment on "zap01" Server:
- During task 6, we had already downloaded the playbook from the Git repository to the Ansible server in the following location:
# cd /git-data/ansible
- Next, move the 'lamp01' folder from '/git-data/ansible' to '/home/ansible'
# mv zabbix-5 /home/ansible
- After moving the folder, change the ownership of the files
# chown -R ansible.ansible /home/ansible/zabbix-5
- Execute Ansible playbooks for Zabbix monitoring deployment on "zap01" server
# ansible-playbook zabbix-installation.yml
# ansible-playbook mariadb-installation.yml
# ansible-playbook create-db-table.yml
# ansible-playbook zabbix-service.yml
Zabbix Monitoring Implementation Process:
The deployment and configuration of Zabbix monitoring involve two processes: installation and configuration on the server side and website. We had complete server side installation now we will proceed with website configuration
Login to win01 server and open url http://zap01.darole.org/zabbix
1. Welcome screen
2. Will check the requisites.
3. Configure DB connection
Note: Password is redhat
4. Configure Server details.
Note: Name : zap01.darole.org
5. Pre-installation Summary
6. Installation completed.
7. Login screen
Username: Admin
Password: zabbix
8. Let unable Auto Registration of Linux agent
Goto Configuration > Action > Auto Registration > create action.
Action name Linux Server and Host metadata contains LinuxServers.
In Operations add host, add host group and Linux to templates
9. Create two playbooks for installation zabbix agent on Centos, Redhat and ubuntu
$ ansible-playbook zabbix-rhel8-agent.yml
$ ansible-playbook zabbix-ubuntu20-agent.yml
10. Go to console and check for all hosts are visible.
Note: Zabbix is a comprehensive monitoring solution, and the provided Ansible playbooks automate the deployment and initial configuration of Zabbix components. The web-side implementation is essential to configure monitoring items, triggers, and other settings for effective monitoring of your infrastructure. The provided blog link and GitHub repository offer further guidance on the implementation process.
Monitor VMware Esxi hosts using Zabbix 5
1. Login to zap01 and perform the below changes.
# vi /etc/zabbix/zabbix_server.conf | grep -i StartVMwareCollectors
### Option: StartVMwareCollectors
StartVMwareCollectors=5
# systemctl restart zabbix-server
2. Manually add EXSi host details in zabbix portal.
Monitor Docker containers using Zabbix 5
1. Check the docker containers.
root@dock01:~# docker ps
2. Give the permission to zabbix agent to monitor docker.
root@dock01:~# usermod -aG docker zabbix
3. Restart Zabbix Agent and check status.
root@dock01:~# systemctl restart zabbix-agent2
root@dock01:~# systemctl status zabbix-agent2
4. To check the connectivity from zabbix server to docker client use below command.
[root@zap01 ~]# zabbix_get -s dock01 -k docker.info
Create "zap-admin" User for Zabbix Alerts:
Create a user named "zap-admin" to receive alerts from the Zabbix monitoring system.
Your "pup01" server is now set up to send and receive emails using Postfix, retrieve emails using Dovecot, and access emails via the SquirrelMail webmail interface. Additionally, the "zab-admin" user can be used to receive alerts from the Zabbix monitoring system.
Configure Mail Server in Zabbix:
1. Log in to the Zabbix portal. Go to the Administration tab, then click on Media types. Provide the SMTP server IP address, the SMTP HELO domain name, and enable the SMTP email address.
2. Go to Configuration and enable the action.
3. Check again in Administration tab and sent test mail 4. Login to pup01.darole.org webmail portal and check test mail.
5. Since all the notification are send the user, hence you need to add media details to users.
6. To test the monitoring we will reboot non production server and check on dashboard and on webmail.
Alerts on Dashboard
Email generated for host down.
Go to topics
13(A). Centralized Log Server (ans01) Configuration:
a. Edit the rsyslog configuration file on the centralized log server:
# vi /etc/rsyslog.conf
b. Configure the server to listen for UDP and TCP logs on port 514:
module(load="imudp")
input(type="imudp" port="514")
module(load="imtcp")
input(type="imtcp" port="514")
c. Define a template for storing incoming logs:
$template RemInputLogs, "/var/log/client_logs/%FROMHOST-IP%/%PROGRAMNAME%.log"
*.* ?RemInputLogs
d. Restart the rsyslog service to apply the changes:
# systemctl restart rsyslog
e. Create the directory to store client logs and adjust permissions:
# mkdir /var/log/client_logs
# chown -R syslog:adm /var/log/client_logs/
13(B). Client Configuration:
a. Edit the rsyslog configuration file on the client:
# vi /etc/rsyslog.conf
b. Configure the client to send logs to the centralized log server using TCP:
*.* @@172.16.1.223:514
c. Configure an action queue for reliability (optional but recommended):
$ActionQueueFileName queue
$ActionQueueMaxDiskSpace 1g
$ActionQueueSaveOnShutdown on
$ActionQueueType LinkedList
$ActionResumeRetryCount -1
d. Restart the rsyslog service to apply the changes:
# systemctl restart rsyslog
e. Test sending a log message to the centralized server:
# logger "This test message `hostname`"
This setup should allow the client to send logs to the centralized log server over TCP. The logs will be stored in the `/var/log/client_logs` directory on the centralized log server, organized by the client's IP address and program name. You can further customize the configuration to meet your specific needs, such as log rotation, filtering, and more.
15. Stress Testing and Analysis:
- Created stress test scripts for network data flow, CPU, and memory load.
- Analyzed network traffic, CPU, and memory usage using tools like tcpdump, sar, top, etc.
15. Additional Testing and Monitoring:
- Deleted Ansible user on lamp01 to verify Puppet's user management.
- Monitored web application uptime using Zabbix.
- Tested web application and server resilience.
16. Conclusion and Future Steps:
- Successfully deployed and configured VMware vCenter 7, VMware ESXi 7, Puppet 5, Ansible 3.1, Zabbix 5, and SquirrelMail Webmail.
- Enhanced server management, monitoring, and communication within the IT environment.
- Ongoing monitoring, maintenance, and potential expansion of the infrastructure.
The completion of this project showcases the effective utilization of Red Hat technologies to create a robust IT infrastructure stack, providing virtualization, configuration management, monitoring, and mail services. The implementation of a dual-network setup enhances security and separates internal communication from external internet access, ensuring efficient and secure operations. Continuous monitoring and optimization of the infrastructure using Red Hat solutions will ensure its reliability and scalability for future needs.
Note: If we delete the VM from EXSi then you will see it in VM Center as orphaned


Task 20. RHEL 7.7 to RHEL 7.9 Upgrade Procedure for lamp01 Servers
1. Check Available Packages for Patching:
- Begin the upgrade process by checking the available packages for patching. Identify the updates and new kernel version that are available for the RHEL 7.9 upgrade.
# yum check-update kernel
# yum check-update | wc -l
2. Schedule OS Patching Date and Time:
- Plan the OS patching for a convenient date and time. In this case, the scheduled date is October 25, 2023, at 18:30.
3. Perform OS Snapshot:
- Log in to the ESXi02 portal and take an OS Snapshot with the name "OS-Patching 25-Oct-2023." This snapshot is a safety net in case you need to revert.
4. Put Zabbix Monitoring in Maintenance Mode:
- Log in to the Zabbix portal and create a maintenance window. This is done to avoid receiving false alarms during the upgrade.
5. Perform OS Precheck:
- Execute the `
pre-post-check.sh` script to perform a precheck. The script collects important information such as the OS version, `/etc/fstab`, `/etc/grub` configuration, mail settings, bonding, sysctl, network configuration, routes, kernel release, mounted points, and running services.
6. Update the Servers:
- Update the servers using the following command:
# yum update -y
7. Reboot Servers:
- Reboot the servers to apply the updates. Ensure this is scheduled during a maintenance window to minimize downtime.
# reboot
8. Perform OS Post Check:
- Execute the `pre-post-check.sh` script again to perform a post-upgrade check. The script will highlight any differences and verify system configuration.
Before OS Patching kernel
Linux lamp01.darole.org 3.10.0-1062.el7.x86_64
After OS Patching kernel
Linux lamp01.darole.org 3.10.0-1160.102.1.el7.x86_64
9. Check the LAMP Application:
- Verify the LAMP application on the lamp01 server by adding data to the website. Access the website at http://lamp01.darole.org.
10. Delete Snapshot the Next Day:
- After confirming the upgrade's success, log in to the ESXi02 portal and delete the "OS-Patching 25-Oct-2023" OS Snapshot. It is recommended to perform this step on the following day to ensure no post-upgrade issues arise.
This structured procedure ensures a safe and successful upgrade from RHEL 7.7 to RHEL 7.9 while minimizing risks. Always remember to plan for backups, downtime, and thorough checks after the upgrade process.
Task 21. RHEL 8.10 to RHEL 9.5 OS Upgrade Procedure for lamp01 Servers
1. Upgrade Server to RHEL 8.10 Version:
# yum update -y && reboot
2. Schedule OS Patching Date and Time:
- The scheduled date is October 28, 2024, at 18:30.
3. Perform OS Snapshot:
- Log in to the ESXi02 portal and take an OS Snapshot with the name "OS-Upgrade 28-Oct-2024." This snapshot acts as a safety net for potential rollbacks.
4. Put Zabbix Monitoring in Maintenance Mode:
5. Perform OS Precheck:
6. Check Application Package Versions:
[root@lamp01 ~]# rpm -q httpd
httpd-2.4.6-99.el7_9.1.x86_64
[root@lamp01 ~]# rpm -q mariadb
mariadb-5.5.68-1.el7.x86_64
[root@lamp01 ~]# rpm -q mariadb-server
mariadb-server-5.5.68-1.el7.x86_64
[root@lamp01 ~]# rpm -q php
php-5.4.16-48.el7.x86_64
[root@lamp01 ~]# rpm -q php-mysql
php-mysql-5.4.16-48.el7.x86_64
Backup the Database:
# mysqldump -u root -p --all-databases > databases-backup.sql
8. Install the Leapp Utility:
# yum install leapp-upgrade -y
9. Run Preupgrade:
# leapp preupgrade
10. Examine the Leapp report to identify and address any issues or recommendations:
# cat /var/log/leapp/leapp-report.txt
Note: Below are problem faced during my upgrade.
[root@web01 ~]# more /var/log/leapp/leapp-report.txt
Risk Factor: high (inhibitor)
Title: Cannot perform the VDO check of block devices
Summary: The check of block devices could not be performed as the 'vdo' package is not installed. All VDO devices must be converted to LVM management
prior to the upgrade to prevent the loss of data.
Related links:
- Importing existing VDO volumes to LVM: https://red.ht/import-existing-vdo-volumes-to-lvm
Remediation: [hint] Install the 'vdo' package and re-run upgrade to check for VDO devices requiring conversion or confirm that all VDO devices, if an
y, are managed by LVM.
Key: 429a99e13b19a7eebadbb8cb35233d8119bcf255
----------------------------------------
Risk Factor: high (inhibitor)
Title: Possible problems with remote login using root account
Summary: OpenSSH configuration file will get updated to RHEL9 version, no longer allowing root login with password. It is a good practice to use non-
root administrative user and non-password authentications, but if you rely on the remote root login, this change can lock you out of this system.
Related links:
- Why Leapp Preupgrade for RHEL 8 to 9 getting "Possible problems with remote login using root account" ?: https://access.redhat.com/solutions/70
03083
Remediation: [hint] If you depend on remote root logins using passwords, consider setting up a different user for remote administration or adding a c
omment into the sshd_config next to the "PermitRootLogin yes" directive to prevent rpm replacing it during the upgrade.
Key: 3d21e8cc9e1c09dc60429de7716165787e99515f
----------------------------------------
Risk Factor: high (inhibitor)
Title: Missing required answers in the answer file
Summary: One or more sections in answerfile are missing user choices: check_vdo.confirm
For more information consult https://red.ht/leapp-dialogs.
Related links:
- Leapp upgrade fail with error "Inhibitor: Missing required answers in the answer file.": https://access.redhat.com/solutions/7035321
Remediation: [hint] Please register user choices with leapp answer cli command or by manually editing the answerfile.
[command] leapp answer --section check_vdo.confirm=True
Key: 2f9802dc91315806c7cdc3c18d7b74f2a2383285
----------------------------------------
Resolve Issues Highlighted by Leapp Utility:
Issue 1: Minimum memory requirements for RHEL 9 are not met
Summary: Memory detected: 991 MiB, required: 1536 MiB
Currently memory is 1GB but upgrade required 2 GB .
Issue 2: Missing required answers in the answer file
Summary: One or more sections in answerfile are missing user choices: authselect_check.confirm
[command] leapp answer --section check_vdo.confirm=True
Issue 3: Possible problems with remote login using root account
Summary: OpenSSH configuration file will get updated to RHEL9 version, no longer allowing root login with password. It is a good practice to use non-
root administrative user and non-password authentications, but if you rely on the remote root login, this change can lock you out of this system.
# vi /etc/ssh/sshd_config
# PermitRootLogin yes
# systemctl restart sshd
Refer Issue 5 for web and db01 cluster
11. Run the Upgrade:
After addressing the issue you need to rerun leapp preupgrade command to generate answer file and report will be in green
# leapp preupgrade
# leapp upgrade
12. After the upgrade process is completed, manually reboot the system to apply the changes.
13. Execute the `pre-post-check.sh` script once again to perform a post-upgrade check. This helps identify any differences and verifies system configurations.
14. Check the LAMP Application:
After the OS upgrade, if the LAMP application is unable to retrieve data from the database http://lamp01.darole.org/complete-report.php
Apache web server on CentOS 8/RHEL 8 by default uses PHP-FPM instead of mod_php to run PHP code, so in the above command we also installed php-fpm.
# dnf install php php-fpm php-mysqlnd php-opcache php-gd php-xml php-mbstring -y
After it’s installed, we need to start it.
# systemctl start php-fpm
Enable auto start at system boot time.
# systemctl enable php-fpm
Check status:
# systemctl status php-fpm
Before starting website upgrade the database and restart the service:
# mysql_upgrade -u root -p
# systemctl restart httpd
# systemctl restart mariadb
Verify the functionality of the LAMP application on the lamp01 server by adding data to the website. Access the website at http://lamp01.darole.org/complete-report.php
15. Delete Snapshot the Next Day:
- After ensuring the upgrade's success, log in to the ESXi02 portal and delete the "OS-Upgrade 28-Oct-2023" OS Snapshot. It is advisable to perform this step the following day to address any potential post-upgrade issues.
This detailed procedure ensures a safe and successful transition from RHEL 7.9 to RHEL 8 for the lamp01 servers while minimizing risks and ensuring data integrity. Always be prepared with backups and follow best practices during such upgrades.
Note: During the OS upgrade on web01 and db01, another issue was encountered.
Issue 5: Use of HA cluster detected. Upgrade can't proceed.
Summary: HA cluster is not supported by the inplace upgrade.
HA cluster configuration file(s) found. It seems to be a cluster node.
Remediation: [hint] Destroy the existing HA cluster or (if you have already removed HA cluster packages) remove configuration files /var/lib/pacemaker/cib/cib.xml and /etc/corosync/corosync.conf
[command] sh -c pcs cluster stop --all --wait && pcs cluster destroy --all
[root@web01 ~]# pcs cluster stop && pcs cluster destroy
[root@db01 ~]# pcs cluster stop && pcs cluster destroy
Since the cluster is complete destroyed while OS upgrade we need to reconfigure the cluster. there are few changes given below.
In RHEL-9, the process is as follows:
[root@web01 ~]# systemctl start pcsd
[root@db01 ~]# systemctl start pcsd
[root@web01 ~]# pcs cluster setup web_cluster web01 db01
No addresses specified for host 'web01', using 'web01'
No addresses specified for host 'db01', using 'db01'
Destroying cluster on hosts: 'db01', 'web01'...
db01: Successfully destroyed cluster
web01: Successfully destroyed cluster
Requesting remove 'pcsd settings' from 'db01', 'web01'
db01: successful removal of the file 'pcsd settings'
web01: successful removal of the file 'pcsd settings'
Sending 'corosync authkey', 'pacemaker authkey' to 'db01', 'web01'
db01: successful distribution of the file 'corosync authkey'
db01: successful distribution of the file 'pacemaker authkey'
web01: successful distribution of the file 'corosync authkey'
web01: successful distribution of the file 'pacemaker authkey'
Sending 'corosync.conf' to 'db01', 'web01'
db01: successful distribution of the file 'corosync.conf'
web01: successful distribution of the file 'corosync.conf'
Cluster has been successfully set up.
[root@web01 ~]#
[root@web01 ~]# pcs cluster start --all
web01: Starting Cluster...
db01: Starting Cluster...
[root@db01 ~]# systemctl start pcsd
[root@db01 ~]# pcs status
Cluster name: web_cluster
Cluster Summary:
* Stack: corosync (Pacemaker is running)
* Current DC: web01 (version 2.1.8-3.el9-3980678f0) - partition with quorum
* Last updated: Sat Apr 19 12:48:13 2025 on db01
* Last change: Sat Apr 19 12:42:00 2025 by root via root on web01
* 2 nodes configured
* 0 resource instances configured
Node List:
* Online: [ db01 web01 ]
Full List of Resources:
* No resources
Daemon Status:
corosync: active/disabled
pacemaker: active/disabled
pcsd: active/disabled
[root@db01 ~]#
[root@web01 ~]# pcs resource create httpd_fs Filesystem device="/dev/vg01/lv01" directory="/var/www/html" fstype="xfs" --group apache
[root@web01 ~]# pcs resource create httpd_vip IPaddr2 ip=172.16.1.225 cidr_netmask=16 --group apache
[root@web01 ~]# pcs resource create httpd_ser apache configfile="/etc/httpd/conf/httpd.conf" statusurl="http://172.16.1.225/" --group apache
Task 22 Installing Apache Tomcat 10 on tomd01 and tomp01
Apache Tomcat is a widely used Java servlet container that provides a robust environment for running Java applications. Here's a simple guide to installing Apache Tomcat 10 on Ubuntu 20.04:
Step 1: Create a Tomcat User
# useradd -m -d /opt/tomcat -U -s /bin/false tomcat
Step 2: Update System and Install Java Development Kit (JDK)
# apt update
# apt install default-jdk
# java -version
Step 3: Download and Extract Apache Tomcat
# cd /tmp
# wget https://archive.apache.org/dist/tomcat/tomcat-10/v10.0.11/bin/apache-tomcat-10.0.11.tar.gz
# tar xzvf apache-tomcat-10*tar.gz -C /opt/tomcat --strip-components=1
Step 4: Set Permissions
# chown -R tomcat:tomcat /opt/tomcat/
# chmod -R u+x /opt/tomcat/bin
Step 5: Configure Tomcat Users
# vi /opt/tomcat/conf/tomcat-users.xml
Add the following lines before the closing `</tomcat-users>` tag:
<role rolename="manager-gui" />
<user username="manager" password="redhat" roles="manager-gui" />
<role rolename="admin-gui" />
<user username="admin" password="redhat" roles="manager-gui,admin-gui" />
Save and close the file.
Step 6: Remove IP Restrictions, by committing the below lines
# vi /opt/tomcat/webapps/manager/META-INF/context.xml
<!-- <Valve className="org.apache.catalina.valves.RemoteAddrValve"
allow="127\.\d+\.\d+\.\d+|::1|0:0:0:0:0:0:0:1" /> -->
# vi /opt/tomcat/webapps/host-manager/META-INF/context.xml
<!-- <Valve className="org.apache.catalina.valves.RemoteAddrValve"
allow="127\.\d+\.\d+\.\d+|::1|0:0:0:0:0:0:0:1" /> -->
Comment out the Valve definition for both Manager and Host Manager.
Step 7: Configure Tomcat Service and Add the following content.
# vi /etc/systemd/system/tomcat.service
[Unit]
Description=Tomcat
After=network.target
[Service]
Type=forking
User=tomcat
Group=tomcat
Environment="JAVA_HOME=/usr/lib/jvm/java-1.11.0-openjdk-amd64"
Environment="JAVA_OPTS=-Djava.security.egd=file:///dev/urandom"
Environment="CATALINA_BASE=/opt/tomcat"
Environment="CATALINA_HOME=/opt/tomcat"
Environment="CATALINA_PID=/opt/tomcat/temp/tomcat.pid"
Environment="CATALINA_OPTS=-Xms512M -Xmx1024M -server -XX:+UseParallelGC"
ExecStart=/opt/tomcat/bin/startup.sh
ExecStop=/opt/tomcat/bin/shutdown.sh
RestartSec=10
Restart=always
[Install]
WantedBy=multi-user.target
Save and close the file.
Step 8: Reload systemd, Start and Enable Tomcat Service
# systemctl daemon-reload
# systemctl start tomcat
# systemctl enable tomcat
That's it! Apache Tomcat 10 is now installed and configured on your Ubuntu 20.04 server. You can access the Tomcat server by navigating to `http://tomd01:8080` in your web browser.
Follow the same steps and install on tomp01
Deploying a Simple Tomcat Web Application with Maven
In this blog, we will walk through the steps to deploy a simple Tomcat web application using Git and Maven.
Step 1: Create and Navigate to the Git Directory
# mkdir /git ; cd /git
Step 2: Clone the Repository
# git clone https://github.com/vdarole/tomcat-war.git
Step 3: Update the Package List
# apt update
Step 4: Install Maven
# apt install maven
Step 5: Verify Maven Installation
# mvn -version
Step 6: Compile the Project
# cd tomcat-war ; mvn compile
Step 7: Run Tests
# mvn test
Step 8: Package the application into a WAR file
# mvn package
Step 9: Deploy the WAR File to Tomcat
# cp /git/tomcat-war/target/SimpleTomcatWebApp.war /opt/tomcat/webapps/
Step 10: Login to win01 and open the below URL
http://tomp01.darole.org:8080/SimpleTomcatWebApp/
Task 23 . Jenkin server configuration on jen01.In this section, we will walk through the configuration steps taken to set up the Jenkin server (jen01) and perform various automation tasks within the environment.
Updating Jenkins Server:
To ensure compatibility with the latest Jenkins modules, we updated the "jen01" virtual machine from Ubuntu 18 to Ubuntu 20, and then to Ubuntu 22. Below are the steps followed for each upgrade:
VM Specifications
- Hostname: Rocky
- CPU: 1
- Memory: 1 GB
- Disk: 16 GB
- Internal IP: 172.16.1.252
- External IP: 172.16.1.252
- User: root
- Password: redhat
Installation and Setup Steps
1. Install Java, wget, and rsyslog:
# dnf install java-17-openjdk-devel wget rsyslog
2. Start rsyslog service:
# systemctl start rsyslog
3. Add Jenkins repository:
# wget -O /etc/yum.repos.d/jenkins.repo https://pkg.jenkins.io/redhat/jenkins.repo
4. Import Jenkins GPG key:
# rpm --import https://pkg.jenkins.io/redhat/jenkins.io-2023.key
5. Install Jenkins:
# dnf install jenkins
6. Start Jenkins service:
# systemctl start jenkins
7. Enable Jenkins to start on boot:
# systemctl enable jenkins
8. Check Jenkins service status:
# systemctl status jenkins
9. Access Jenkins
Open a browser and navigate to http://jen01.darole.org:8080
Retrieve the Initial Admin Password
To unlock Jenkins, you need to retrieve the initial admin password from the Jenkins server.
# cat /var/lib/jenkins/secrets/initialAdminPassword
Copy the password displayed in the terminal.
10. Install Suggested Plugins
On the "Customize Jenkins" page, select "Install suggested plugins."
Jenkins will automatically install the recommended plugins. This may take a few minutes.
11. Create the First User
Once the plugins are installed, you will be prompted to create the first Jenkins user.
Fill in the following fields:
- Username: admin
- Password: redhat
- Full name: administrator
- Email: ansible@pup01.darole.org
Click "Save and Finish."
12. Configure Jenkins URL
On the "Instance Configuration" page, set the Jenkins URL to http://jen01.darole.org:8080/.
Click "Save and Finish."
13. Jenkins is Ready
You will see a confirmation page indicating that "Jenkins is ready!"
Click "Start using Jenkins" to proceed to the Jenkins dashboard.
14. Jenkins Dashboard
You will now be directed to the Jenkins dashboard, where you can start creating jobs, managing configurations, and utilizing all the features Jenkins offers.
Jenkins Agent Installation and Configuration.


- Under Security settings, go to Agents and Select TCP port for inbound agents as "Random", then Save and exit.
- Go to Dashboard then click on Manage Jenkins

- Enter the node name as dock01 (since we are implementing it on the dock01 node). Select Permanent Agent and click on Create.
- Set the Remote root directory to /root/jenkins.(Ensure this directory is created on the dock01 node as well.) Click Save and Close.
- Click on dock01 to configure the agent.
- After clicking on dock01, you will see the agent connection command.
- Copy the command and execute it on the dock01 server. Run the following commands sequentially on dock01:
root@dock01:~# apt update
root@dock01:~# apt install default-jre
root@dock01:~# apt install openjdk-17-jre-headless
root@dock01:~# curl -sO http://jen01.darole.org:8080/jnlpJars/agent.jar
root@dock01:~# java -jar agent.jar -url http://jen01.darole.org:8080/ -secret 8331411ab4e1600c2e15067f0cb5ad345713d78436f6c40d71cb5f7c9290cca7 -name dock01 -workDir "/root/jenkins"&
- Once the commands are executed, the agent installation will be completed. You should see the dock01 node details in Jenkins.
Building and Deploying Software Projects in Jenkins
1. Deploying the "Travel-Site" Project
Step 1: Navigate to the Jenkins Dashboard
Click on New Item.
Step 2: Configure Project
- Name the project travel-site.
- Select Freestyle Project and click OK.
Step 3: Configure Source Code Management
On the project configuration page:
- Set GitHub project with the URL: https://github.com/vdarole/jenkin.git.
- Under Source Code Management, choose Git and provide the repository URL: https://github.com/vdarole/jenkin.git.
- Specify the branch to build as */main.
Step 4: Restrict Project to Run on Specific Nodes
Check Restrict where this project can be run.
Enter dock01 in the field to ensure this project runs on the dock01 node.
Step 5: Add Build Steps
Under Build, select Execute Shell.
Paste the following script:
docker build -t nginx_ubuntu .
docker container run --name travel -dit -v /git-data/web-temp/Travel/:/var/www/html -p 172.16.1.218:80:80 nginx_ubuntu
docker exec -d travel /usr/bin/systemctl start nginx
Save and exit.
Step 6: Save and Trigger Build
Click Save and then Build Now.
Step 7: Monitor Build Output
Once the build starts, click on the Build Number under Build History.
Navigate to Console Output to monitor the build progress.


Step 8: Verify Deployment
Log in to the dock01 server and check the Docker container status using the following command:
root@dock01:~# docker ps
CONTAINER ID IMAGE COMMAND CREATED STATUS PORTS NAMES
430aff3b126e nginx_ubuntu "/bin/bash" About a minute ago Up About a minute 172.16.1.218:80->80/tcp farm
root@dock01:~#
Open the browser and visit: http://travel.darole.org/.
2. Deploying the "Carvilla" Project
Step 1: Create a New Project
Navigate to the Jenkins Dashboard.
Click on New Item, name the project carvilla, and select Freestyle Project. Click OK.
Name the Project as carvilla, Select Freestyle Project option. then click on ok

Step 2: Configure Project
Configure it similarly to the travel-site project:
- GitHub project URL: https://github.com/vdarole/jenkin.git.
- Git Repository URL: https://github.com/vdarole/jenkin.git.
- Branch to build: */main.
Step 3: Restrict Project to Run on Specific Nodes
Under General, check Restrict where this project can be run and set the node as dock01.
Branches to build is */main
Step 4: Add Build Steps
Under Build, select Execute Shell and paste the following script:
docker build -t nginx_ubuntu .
docker container run --name carvilla -dit -v /git-data/web-temp/carvilla/:/var/www/html -p 172.16.1.220:80:80 nginx_ubuntu
docker exec -d carvilla /usr/bin/systemctl start nginx
Save and exit.
Step 5: Save and Trigger Build
Click Save and then Build Now.
Step 6: Monitor Build Output
Access the Console Output for the build to ensure it runs successfully.
Step 7: Verify Deployment
Log in to the dock01 server and execute:
root@dock01:~# docker ps
CONTAINER ID IMAGE COMMAND CREATED STATUS PORTS NAMES
58237a873ade nginx_ubuntu "/bin/bash" About a minute ago Up About a minu te 172.16.1.220:80->80/tcp carvilla
b501cda42533 nginx_ubuntu "/bin/bash" 2 hours ago Up 2 hours 172.16.1.218:80->80/tcp travel
root@dock01:~#
Open the browser and visit: http://carvilla.darole.org/.
Task 24 Integrating a Linux Server with Active Directory
Prerequisites:
- A Linux server with root access (e.g.,
lamp01). - An existing Active Directory domain (e.g.,
darole.org). - AD administrative credentials (e.g.,
vallabh@darole.org).
1. Configure DNS for AD Domain Resolution
Ensure the Linux server can resolve the AD domain by editing /etc/resolv.conf:
# cat /etc/resolv.conf
search darole.org
nameserver 172.16.1.200
nameserver 192.168.2.1
options timeout:2
Verify the DNS SRV records for LDAP and Kerberos:
# dig +short SRV _ldap._tcp.darole.org
# dig +short SRV _kerberos._tcp.darole.org
# dig +short SRV _kerberos._udp.darole.org
2. Install Required Packages
Install the necessary tools for AD integration:
# yum install adcli realmd sssd oddjob oddjob-mkhomedir samba-common-tools krb5-workstation authselect-compat openldap-clients
3. Configure Kerberos
Edit /etc/krb5.conf for Kerberos authentication:
cat /etc/krb5.conf
includedir /etc/krb5.conf.d/
[logging]
default = FILE:/var/log/krb5libs.log
kdc = FILE:/var/log/krb5kdc.log
admin_server = FILE:/var/log/kadmind.log
[libdefaults]
dns_lookup_realm = true
dns_lookup_kdc = true
ticket_lifetime = 24h
renew_lifetime = 7d
forwardable = true
rdns = false
pkinit_anchors = FILE:/etc/pki/tls/certs/ca-bundle.crt
spake_preauth_groups = edwards25519
default_realm = DAROLE.ORG
default_ccache_name = KEYRING:persistent:%{uid}
udp_preference_limit = 0
[realms]
DAROLE.ORG = {
kdc = 172.16.1.200
admin_server = 172.16.1.200
}
Test Kerberos authentication:
# kinit vallabh@DAROLE.ORG
# klist
4. Verify LDAP Connectivity
Use ldapsearch to query the AD domain:
# ldapsearch -H ldap://172.16.1.200 -D "vallabh@darole.org" -W -b "dc=darole,dc=org"
5. Join the Linux Server to AD Domain
Join the AD domain using the realm command:
# realm join -v darole.org -U vallabh
Verify the AD integration:
# id -a vallabh@darole.org
6. Test SSH Login Using AD Credentials
From a remote machine:
ssh lamp01 -l vallabh@darole.org
Conclusion
The Linux server is now successfully integrated into the AD domain. Users can log in with their AD credentials and access resources as authorized.
Task 25. Initiating the Infrastructure Project: Startup and Sequence Guide
Initiating the Infrastructure Project: Startup and Sequence Guide with vCenter
1. Begin by booting your desktop.
2. Launch VMware Workstation.
3. Start the VMs Win01, Esxi01, and Esxi02.
4. Wait until the VMs are up and running.
5. Once the VMs are operational, log in to Win01.
6. Open the Chrome browser and access the Esxi01 website at https://esxi01.darole.org/ui/#/login with the following credentials:
- Username: root
- Password: Pass@1234
7. Disable ESXi hypervisors' maintenance mode.
8. Initiate VCenter01, which may take up to 20 minutes to boot.
9. Access the Esxi02 website at https://esxi02.darole.org/ui/#/login using the following credentials:
- Username: root
- Password: Pass@1234
10. Remove the ESXi hypervisors from maintenance mode.
11. Log in to VMware vCenter Server Management at https://vcenter01.darole.org:5480/ with the following credentials:
- Username: Administrator.vsphere.local
- Password: Pass@1234
12. Log in to VMware vCenter at https://vcenter01.darole.org/ with the same credentials provided above.
13. Start the VMs in the following sequence:
1. ans01
2. pup01
3. lamp01
4. web01
5. db01
6. dock01
7. zap01
8. tomd01
9.tomp01
10.jen01
Note:
- Once VCenter is started, it will initiate VCenter agents on the ESXi hosts.
- Do not start kub01 and kub02, as the desktop has limited available resources.
After starting the VMs, check their uptime using the following command on ans01:
ansible@ans01:~$ ansible linux -a uptime -i inventory.txt
Once the server are up you need check puppet service on pup01 if it stop then start the service
# systemctl status puppetserver
Check the chrony status.
[root@lamp01 ~]# chronyc sources -v
Once the server are up you need start the cluster server on web01 and db01
# ssh web01 -l vallabh@darole.org
# su -
# lsblk
NAME MAJ:MIN RM SIZE RO TYPE MOUNTPOINT
sda 8:0 0 16G 0 disk
├─sda1 8:1 0 1G 0 part /boot
└─sda2 8:2 0 15G 0 part
├─rhel-root 253:0 0 13.4G 0 lvm /
└─rhel-swap 253:1 0 1.6G 0 lvm [SWAP]
# iscsiadm -m node -T iqn.1991-05.com.microsoft:win01-target01-target -p 172.16.1.200 -l
# lsblk
NAME MAJ:MIN RM SIZE RO TYPE MOUNTPOINT
sda 8:0 0 16G 0 disk
├─sda1 8:1 0 1G 0 part /boot
└─sda2 8:2 0 15G 0 part
├─rhel-root 253:0 0 13.4G 0 lvm /
└─rhel-swap 253:1 0 1.6G 0 lvm [SWAP]
sdb 8:16 0 9G 0 disk
└─vg01-lv01 253:2 0
[root@web01 ~]#systemctl start pcsd
[root@web01 ~]# pcs cluster start
[root@db01 ~]#systemctl start pcsd
[root@db01 ~]# pcs cluster start
[root@db01 ~]# pcs status
[root@db01 ~]# pcs resource move httpd_fs web01
[root@db01 ~]# pcs resource move apache web01
Troubleshoting Steps
# pcs constraint location
# pcs resource clear httpd_fs
# pcs resource clear httpd_ser
# pcs resource clear httpd_vip
# pcs resource restart apache
# pcs status nodes
# pcs resource show httpd_ser
Once the web cluster is up and working kindly start the dock01 containers.
Docker Containerization and Image Building Documentation
1. Ubuntu Container with Apache
Pull Ubuntu Image and Run Container
# docker pull ubuntu
# docker run -it -d --name ubuntu ubuntu
# docker exec -it ubuntu bash
Install Apache in Ubuntu Container
# apt update
# apt install apache2 systemctl -y
# exit
Commit Changes and Create New Container
# docker commit ubuntu apache_ubuntu
# docker container run --name education -dit -v /git-data/web-temp/Education/:/var/www/html -p 172.16.1.216:80:80 apache_ubuntu
# docker exec -it education systemctl start apache2
2. CentOS Container with HTTPD
Pull CentOS Image and Run Container
# docker pull docker.io/vallabh/rocky
# docker run -it -d --name rocky docker.io/vallabh/rocky
# docker exec -it rocky bash
Install HTTPD in CentOS Container
# yum install httpd -y
# exit
Commit Changes and Create New Container
# docker commit rocky apache_rocky
# docker container run --name ninon -dit -v /git-data/web-temp/Ninom:/var/www/html -p 172.16.1.215:80:80 apache_rocky
# docker exec -it ninon /usr/sbin/httpd -DFOREGROUND &
3. Building Custom Nginx Ubuntu Image with Dockerfile
Create Dockerfile for Nginx on Ubuntu
# docker stop ubuntu && docker stop rocky && docker container rm ubuntu && docker container rm rocky
# vi Dockerfile
FROM ubuntu
ENV TZ=Asia/Kolkata
RUN ln -snf /usr/share/zoneinfo/$TZ /etc/localtime && echo $TZ > /etc/timezone
RUN apt-get update
RUN apt-get install -y nginx systemctl
EXPOSE 80
ENV name Devops Tutorial
Build Custom Nginx Image and Run Container
# docker build -t nginx_ubuntu .
# docker container run --name farm -dit -v /git-data/web-temp/FarmFresh/:/var/www/html -p 172.16.1.217:80:80 nginx_ubuntu
# docker exec -it farm systemctl start nginx
This document outlines the steps for creating Docker containers with Ubuntu running Apache, CentOS running HTTPD, and a custom Nginx image built using a Dockerfile. The containers are configured with specific volumes and ports for web applications. Adjust paths, IP addresses, and other configurations as needed for your environment.
Start Kubernetes
Deployment of NGINX using the NGINX1.16 image and we want to use the NodePort Service-type
# kubectl create deployment apache --image=httpd
# kubectl create service nodeport apache --tcp=80:80
root@kub01:~# kubectl get pods -o wide
NAME READY STATUS RESTARTS AGE IP NODE NOMINATED NODE READINESS GATES
apache-f9489c7dc-hdxb6 1/1 Running 0 37s 10.1.206.205 kub02.darole.org <none> <none>
8. Customize your NGINX deployment by modifying the default NGINX welcome page
root@kub01:~# kubectl exec -it apache-f9489c7dc-hdxb6 -- bash
root@apache-f9489c7dc-hdxb6:~# echo "Welcome to `uname -n` host" > /usr/local/apache2/htdocs/index.html
root@apache-f9489c7dc-hdxb6:~# exit
root@kub01:~# kubectl get service
NAME TYPE CLUSTER-IP EXTERNAL-IP PORT(S) AGE
apache NodePort 10.97.52.33 <none> 80:30140/TCP 3m19s
kubernetes ClusterIP 10.96.0.1 <none> 443/TCP 38h
9. Access your NGINX website by using the NodePort:
root@kub01:~# curl 192.168.2.230:30140
Welcome to apache-f9489c7dc-hdxb6 host
root@kub01:~#
10: Scale up the replicas.
# root@kub01:~# kubectl scale --current-replicas=1 --replicas=2 deployment/apache
# kubectl get pods
NAME READY STATUS RESTARTS AGE
apache-f9489c7dc-hdxb6 1/1 Running 0 10m
apache-f9489c7dc-rcrzh 1/1 Running 0 29s
# kubectl delete pod apache-f9489c7dc-hdxb6
root@kub01:~# curl 192.168.2.230:30230
Welcome to apache-f9489c7dc-hdxb6 host
root@kub01:~#
By following these steps, you've installed Kubernetes on kub01 and kub02 and deployed an NGINX web server for your applications.
Kubernetes Deployment and Rollback Documentation
Objective
This document provides a step-by-step walkthrough of deploying a simple Nginx application on Kubernetes, updating the Nginx version, and then rolling back to the previous version. The commands and actions performed are detailed for better understanding.
1. Initial Deployment
root@kub01:~# kubectl apply -f ngnix.yaml deployment.apps/nginx created
2. Check Deployment and Pods
root@kub01:~# kubectl get deployment
NAME READY UP-TO-DATE AVAILABLE AGE
nginx 1/1 1 1 34s
root@kub01:~# kubectl get pods
NAME READY STATUS RESTARTS AGE
nginx-6d4cf56db6-tdxzf 1/1 Running 0 50s
3. Access Pod and Check Nginx Version
root@kub01:~# kubectl exec -it nginx-6d4cf56db6-rpb9w -- bash
root@nginx-6d4cf56db6-rpb9w:/# dpkg --list | grep nginx
ii nginx 1.16.1-1~buster amd64 high performance web server
ii nginx-module-geoip 1.16.1-1~buster amd64 nginx GeoIP dynamic modules
ii nginx-module-image-filter 1.16.1-1~buster amd64 nginx image filter dynamic module
ii nginx-module-njs 1.16.1.0.3.8-1~buster amd64 nginx njs dynamic modules
ii nginx-module-xslt 1.16.1-1~buster amd64 nginx xslt dynamic module
root@nginx-6d4cf56db6-rpb9w:/# exit
root@kub01:~# cp /root/ngnix.yaml /root/ngnix.yaml-backup
4. Update Nginx Version in Deployment YAML
5. Apply Updated Configuration
root@kub01:~# kubectl apply -f ngnix.yaml
deployment.apps/nginx configured
6. Check Pods After Update
root@kub01:~# kubectl get pods
NAME READY STATUS RESTARTS AGE
nginx-6d4cf56db6-rpb9w 0/1 Terminating 0 2m14s
nginx-bb957bbb5-z76rc 1/1 Running 0 4s
7. Access New Pod and Verify Nginx Version
root@kub01:~# kubectl exec -it nginx-bb957bbb5-z76rc -- bash
root@nginx-bb957bbb5-z76rc:/# dpkg --list | grep nginx
ii nginx 1.25.3-1~bookworm amd64 high performance web server
ii nginx-module-geoip 1.25.3-1~bookworm amd64 nginx GeoIP dynamic modules
ii nginx-module-image-filter 1.25.3-1~bookworm amd64 nginx image filter dynamic module
ii nginx-module-njs 1.25.3+0.8.2-1~bookworm amd64 nginx njs dynamic modules
ii nginx-module-xslt 1.25.3-1~bookworm amd64 nginx xslt dynamic module
root@nginx-bb957bbb5-z76rc:/# exit
8. Rollback to Previous Version
root@kub01:~# kubectl rollout history deployment nginx
deployment.apps/nginx
REVISION CHANGE-CAUSE
3 <none>
4 <none>
9. Check Deployment Status and Pods After Rollback
root@kub01:~# kubectl rollout undo deployment nginx
deployment.apps/nginx rolled back
root@kub01:~# kubectl get pods -o wide
NAME READY STATUS RESTARTS AGE IP NODE NOMINATED NODE READINESS GATES
nginx-6d4cf56db6-42g8h 1/1 Running 0 6s 192.168.206.238 kub02.darole.org <none> <none>
nginx-bb957bbb5-z76rc 0/1 Terminating 0 8m22s 192.168.206.237 kub02.darole.org <none> <none>
10. Access Rolled Back Pod and Verify Nginx Version
root@kub01:~# kubectl exec -it nginx-6d4cf56db6-42g8h -- bash
root@nginx-6d4cf56db6-42g8h:/# dpkg --list | grep nginx
ii nginx 1.16.1-1~buster amd64 high performance web server
ii nginx-module-geoip 1.16.1-1~buster amd64 nginx GeoIP dynamic modules
ii nginx-module-image-filter 1.16.1-1~buster amd64 nginx image filter dynamic module
ii nginx-module-njs 1.16.1.0.3.8-1~buster amd64 nginx njs dynamic modules
ii nginx-module-xslt 1.16.1-1~buster amd64 nginx xslt dynamic module
root@nginx-6d4cf56db6-42g8h:/#
Updating and Deploying Code on Tomcat
1. Login to GitHub:
2. Login to Servers:
- Login to tomd01 and tomp01.
3. Execute Commands:
# rm -rf /git/tomcat-war
# rm -rf /opt/tomcat/webapps/SimpleTomcatWebApp.war
# rm -rf /opt/tomcat/webapps/SimpleTomcatWebApp
# cd /git
# git clone https://github.com/vdarole/tomcat-war.git
# cd tomcat-war
# mvn compile
# mvn test
# mvn package
# cp /git/tomcat-war/target/SimpleTomcatWebApp.war /opt/tomcat/webapps/
Your updated application is now deployed!
Verify the links
Deploying the Travel-Site Project with Jenkins
1. Login to Jenkins
Access the Jenkins portal using your credentials.
2. Go Manage Jenkins then Nodes and click on dock01 and get agent details
3. Start the agent service on dock01 server
root@dock01:~# java -jar agent.jar -url http://jen01.darole.org:8080/ -secret b1fb1f921b53441d89fabb99a1246ceb553cf118845ae6fc0b6bd5e8c9f3b1f2 -name dock01 -webSocket -workDir "/root/jenkins" &
4. Trigger the Build
- Navigate to the Travel-Site project on the Jenkins dashboard.
- Click on Build Now to start the build process.
3. Monitor the Build
- Check the Build History section for the status of the build.
- Click on the latest build number and view the Console Output to ensure the build completes successfully.
4. Verify the Deployment
Once the build is successful, open a web browser and visit the site at:
Your Travel-Site project should now be live and accessible!
Task 26. Initiating the Infrastructure Project: Shutdown Sequence Guide
Please Note: Always ensure that you perform shutdown procedures with care and only after confirming that no important work is in progress.
1. Log in to Windows Server:
- Login to the "win01" VM.
- Open a web browser and navigate to VMware vCenter Server Management at https://vcenter01.darole.org:5480/.
- Use the following credentials:
- Username: Administrator.vsphere.local
- Password: Pass@1234
2. Shutdown vCenter:
- In the vCenter Management interface, initiate the shutdown of vCenter.
- Please be patient as this process may take up to 20 minutes to complete. Note that shutting down vCenter will not affect running VMs.
3. Shutdown Linux VMs on Ansible Server (ans01):
- On the "ans01" server, execute the following commands to shutdown Linux VMs:
- To shut down all CentOS and Red Hat VMs:
$ ansible redhat -a "shutdown -h" -b -i inventory.txt
- To shut down all Ubuntu VMs:
$ ansible ubuntu -a "shutdown -h" -b -i inventory.txt
- To shut down Windows VMs:
$ ansible-playbook win-shutdown.yml -i inventory.txt
$ sudo init 0
- Ensure that "web01" and "db01" are shut down properly before proceeding with Ubuntu and Windows shutdown.
4. Access ESXi Hosts:
- Open a web browser on your desktop and access the ESXi hosts at:
- https://192.168.2.205 (ESXi01)
- https://192.168.2.206 (ESXi02)
- Use the following credentials for both ESXi hosts:
- Username: root
- Password: Pass@1234
5. Maintenance Mode for ESXi Hosts:
- Verify that all VMs hosted in ESXi are powered off.
- If VMs are still running, ensure they are shut down properly.
- Enable maintenance mode on both ESXi hypervisors.
- Once maintenance mode is enabled, shut down both ESXi hypervisors.
6. Shutdown Desktop or Server:
- After ensuring all VMs hosted in VMware Workstation are shut down, proceed to power off your desktop or server.
This procedure ensures a structured and safe shutdown of your infrastructure, minimizing the risk of data loss or other issues. Always exercise caution during shutdown procedures.


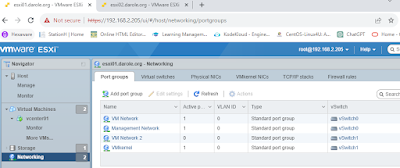


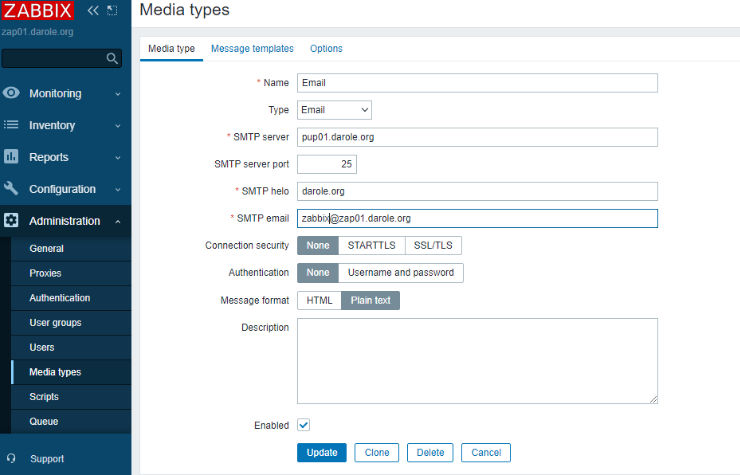


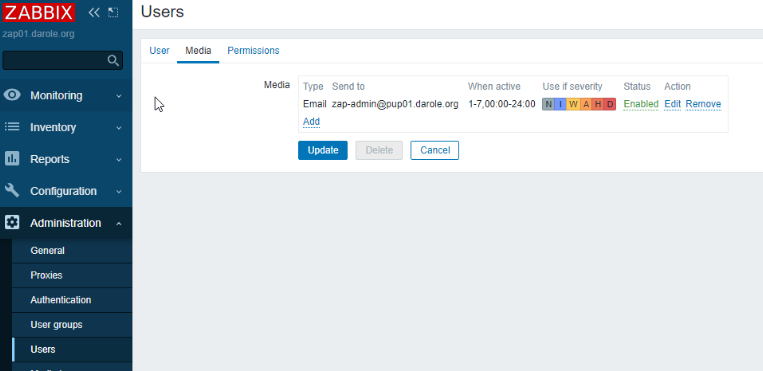


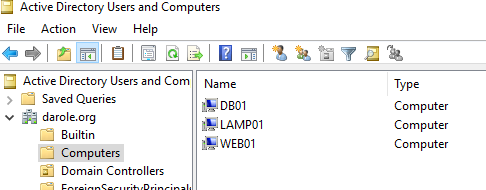


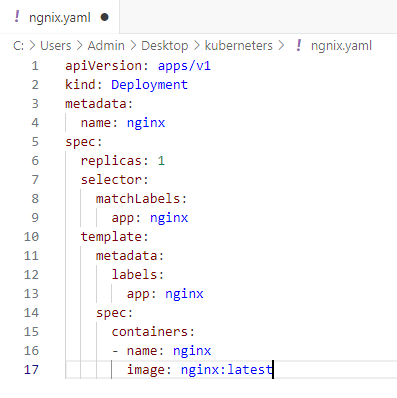


thank you sir
ReplyDeletemy question is in production threre also same project or some different ?
ReplyDeleteProduction Environment
ReplyDeleteEnvironment Configuration:
* Development: Lower-spec hardware.
* Production: High-spec hardware for better performance.
Security:
* Development: Relaxed security.
* Production: Enhanced security measures like HTTPS and firewalls.
Scalability:
* Development: Single instance.
* Production: Multiple instances with load balancers.
Deployment:
* Development: Manual or semi-automated.
* Production: Automated CI/CD pipelines.
Monitoring:
* Development: Basic logging.
* Production: Comprehensive monitoring and logging.
Data Management:
* Development: Mock or subset data.
* Production: Live data with backups.
Performance:
* Development: Focus on functionality.
* Production: Performance optimization.