AWS elastic volumes changed the way of using volumes in ec2 instances. You can now modify the volume’s volume size, performance, or volume type while the volume is in use. Your application will continue to function normally while the change takes effect.
With a simple API call, you can instantly make changes to your storage infrastructure, eliminating or simplifying many of your planning, tuning, and space management duties. Instead of a traditional provisioning process that takes weeks or months, you can now make instantaneous changes to your storage infrastructure.
This tutorial will help you to resize the root partition of the ec2 Linux instance without any downtime for your application. The same steps will also helpful to increase other partitions (non root) of the system.
WARNING: It is strongly recommended to create a full backup (AMI) of your instance before resizing the root volume. This will be helpful for recovering from any unexpected failures.
Resize EBS Volumes in EC2 Linux Instances
The AWS elastic volumes allow online resizing of the volumes without any downtime of your applications. This is very useful for production applications. Here is the step-by-step tutorial to resize the EBS volume on the EC2 instance and grow the partition size.
1. I have a running ec2 instance with Ubuntu Linux. Login to the EC2 dashboard in the AWS account and identify your instance.

2. That was initially launched with 8 GB of EBS volume attached to the EC2 instance. As the application data size grows now, we need to increase the disk space.

3. Check the size of the EBS volume partition attached to the root file system.

4. Go to the EC2 dashboard and right-click on the EBS volume attached to your instance. Click Modify Volume:

5. A dialog box will appear in the browser.Set a new size for your EBS volume and click Modify


6. The volume will now begin the resize and optimization process, which you can see on the console. This will take a couple of minutes to complete ebs resize process. You will see a message in the volume state column:

7. Wait until the volume state column change to “in-use” with green color.
8. Login to your instance and type “lsblk” command to view attached volumes and disk partitions. You may find that the volume size is increased but the partition mounted on the root (/) file system is still the same.
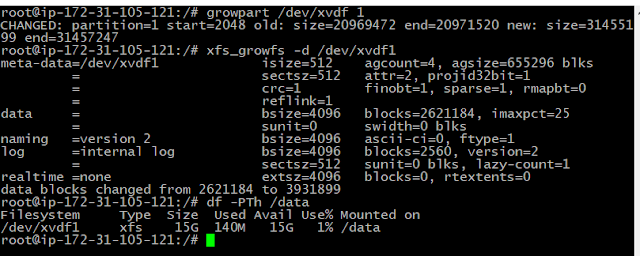
9. Use the “growpart” command to resize the root partition up to the free available volume. This command takes two parameters, first if the volume name, and second is the partition number.
Now you can see the partition size is also increased with the “lsblk” command.
10. Now, you need to resize the partition manually from the command line. Before this, identify the type of filesystem on that partition with the following command:
11. Finally, resize the partition based on the filesystem. In my case, the partition was formatted with Ext4. So I used the “resize2fs” command to resize it.

If the partition is formatted with the XFS file system, then use “xfs_growfs -d /” command to perform this operation.
All done!
Create Volume.


Attach volume to Linux Instance.


No comments:
Post a Comment