Steps to install and configure foreman katello.
update the host file
# cat /etc/hosts
192.168.2.201 repo01.darole.org repo01
# yum install vim -y
Create a seprate partition to store the repository file
# pvcreate /dev/sdb
# vgcreate vg_pulp /dev/sdb
# lvcreate -l 100%FREE -n lv_pulp vg_pulp
# mkfs.xfs /dev/vg_pulp/lv_pulp
# mkdir /var/lib/pulp
# mount /dev/vg_pulp/lv_pulp /var/lib/pulp/
# cat /etc/mtab | grep pulp
# cat /etc/mtab | grep pulp >> /etc/fstab
# df -PTh
Download he respositorys
# yum -y localinstall https://yum.theforeman.org/releases/1.24/el7/x86_64/foreman-release.rpm
# yum -y localinstall https://fedorapeople.org/groups/katello/releases/yum/3.14/katello/el7/x86_64/katello-repos-latest.rpm
# yum -y localinstall https://yum.puppet.com/puppet6-release-el-7.noarch.rpm
# yum -y localinstall https://dl.fedoraproject.org/pub/epel/epel-release-latest-7.noarch.rpm
Install foreman and katello
# yum install foreman-release-scl -y
# yum install katello -y
Configure forman katello
Update the katello-answers file with below datils.
# vim /etc/foreman-installer/scenarios.d/katello-answers.yaml
initial_organization: Darole.org
initial_location: Mumbai
foreman::plugin::ansible: true
Then execute the below command. This command can take more the 30 mins
# foreman-installer --scenario katello --foreman-initial-admin-username admin --foreman-initial-admin-password 'redhat'
Update prtgresql,pulp, candlepin, qpid, tftp, dhcp, apt in katello.yaml file.
# vim /etc/foreman-installer/scenarios.d/katello.yaml
:order:
- certs
- foreman
- katello
- foreman_proxy
- foreman_proxy::plugin::pulp
- foreman_proxy_content
- puppet
- postgresql
- pulp
- candlepin
- qpid
- tftp
- dhcp
- apt
And re-execute the below command.
# foreman-installer --scenario katello --foreman-initial-admin-username admin --foreman-initial-admin-password 'redhat'
open web browsers and login to foreman with user name admin and password redhat
Create product
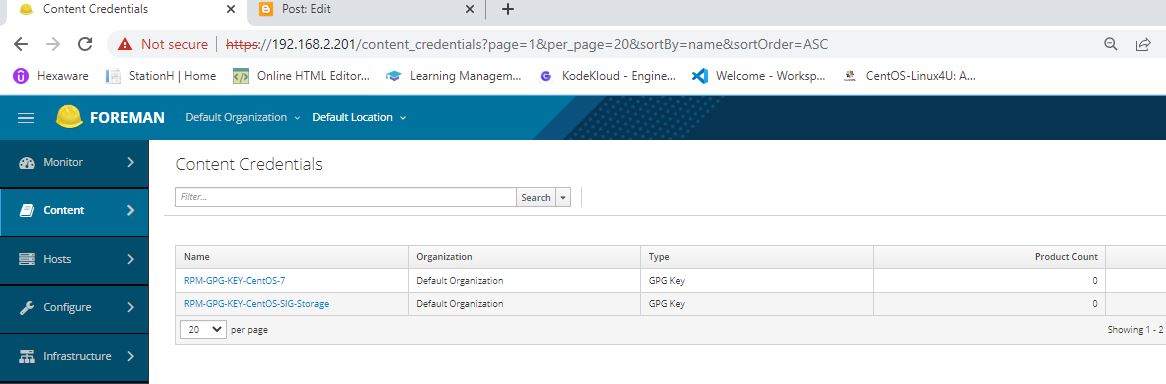
Create GPG Key
https://www.centos.org/keys/RPM-GPG-KEY-CentOS-7
https://www.centos.org/keys/RPM-GPG-KEY-CentOS-SIG-Storage
Create Repositories
go to product then create new repositories
First we will create only one repository and sync it.
Name: Ansible x86_64
Description: Centos OS repository
Type: yum
Restrict to Architecture: x86_64
Upstream URL : http://mirror.centos.org/centos-7/7/configmanagement/x86_64/ansible-29/
Mirror on Sync: No
GPG Key: RPM-GPG-KEY-CentOS-7
Create Lifecycle Environment:
1. development
2. production
production is depended on development
Lets create the content view for repository and subscription.
Add repository to content view
Now promote the content view from library to development and then to production.
Let create the Activation keys for development and production
Added subscription
In details you will get the complete command regarding attaching the subscription.
Perform the same steps for production key.
Now lets login to development server and register the servers.
[root@kvm01 ~]# yum install subscription-manager wget -y
[root@kvm01 ~]# wget https://192.168.2.201/pub/katello-ca-consumer-latest.noarch.rpm --no-check-certificate
[root@kvm01 ~]# yum localinstall katello-ca-consumer-latest.noarch.rpm -y
[root@kvm01 ~]# subscription-manager register --org="darole_org" --activationkey="Centos-Dev"
The system has been registered with ID: 735ee855-dc4a-43b9-abee-d5c243be233e
The registered system name is: kvm01.darole.org
No products installed.
[root@kvm01 ~]# subscription-manager status
+-------------------------------------------+
System Status Details
+-------------------------------------------+
Overall Status: Current
System Purpose Status: Not Specified
[root@kvm01 ~]#
[root@kvm01 ~]# mkdir /etc/yum.repos.d/backup
[root@kvm01 ~]# cd /etc/yum.repos.d/
[root@kvm01 yum.repos.d]# mv CentOS-* backup/
[root@kvm01 yum.repos.d]# yum clean all
[root@kvm01 yum.repos.d]# yum repolist
Loaded plugins: fastestmirror, product-id, search-disabled-repos, subscription-manager
darole_org_CentOS_7_Linux_86_64_Ansible_x86_64 | 2.1 kB 00:00:00
(1/3): darole_org_CentOS_7_Linux_86_64_Ansible_x86_64/group | 124 B 00:00:00
(2/3): darole_org_CentOS_7_Linux_86_64_Ansible_x86_64/updateinfo | 92 B 00:00:00
(3/3): darole_org_CentOS_7_Linux_86_64_Ansible_x86_64/primary | 9.3 kB 00:00:00
Determining fastest mirrors
darole_org_CentOS_7_Linux_86_64_Ansible_x86_64 57/57
repo id repo name status
darole_org_CentOS_7_Linux_86_64_Ansible_x86_64 Ansible x86_64 57
repolist: 57
[root@kvm01 yum.repos.d]#
Now lets login to production server and register the servers.
[root@kvm02 ~]# yum install subscription-manager wget -y
[root@kvm02 ~]# wget https://192.168.2.201/pub/katello-ca-consumer-latest.noarch.rpm --no-check-certificate
[root@kvm02 ~]# yum localinstall katello-ca-consumer-latest.noarch.rpm -y
[root@kvm02 ~]# subscription-manager register --org="darole_org" --activationkey="Centos-Prod"
The system has been registered with ID: 31574fbd-69f2-4a76-a097-3ccbdb609db1
The registered system name is: kvm02.darole.org
No products installed.
[root@kvm02 ~]# subscription-manager status
+-------------------------------------------+
System Status Details
+-------------------------------------------+
Overall Status: Current
System Purpose Status: Not Specified
[root@kvm02 ~]#
[root@kvm02 ~]# mkdir /etc/yum.repos.d/backup
[root@kvm02 ~]# cd /etc/yum.repos.d/
[root@kvm02 yum.repos.d]# ^C
[root@kvm02 yum.repos.d]# mv CentOS-* backup/
[root@kvm02 yum.repos.d]# yum clean all
[root@kvm02 yum.repos.d]# yum repolist
Loaded plugins: fastestmirror, product-id, search-disabled-repos, subscription-manager
darole_org_CentOS_7_Linux_86_64_Ansible_x86_64 | 2.1 kB 00:00:00
(1/3): darole_org_CentOS_7_Linux_86_64_Ansible_x86_64/group | 124 B 00:00:00
(2/3): darole_org_CentOS_7_Linux_86_64_Ansible_x86_64/updateinfo | 92 B 00:00:00
(3/3): darole_org_CentOS_7_Linux_86_64_Ansible_x86_64/primary | 9.3 kB 00:00:00
Determining fastest mirrors
darole_org_CentOS_7_Linux_86_64_Ansible_x86_64 57/57
repo id repo name status
darole_org_CentOS_7_Linux_86_64_Ansible_x86_64 Ansible x86_64 57
repolist: 57
[root@kvm02 yum.repos.d]#
Now both servers are subscripted.
Now we wil create add new repository given below to product
Repositories
Name : CentOS 7 OS x86_64
Description: Centos OS repository
Type: yum
Restrict to Architecture: x86_64
Upstream URL : http://mirror.centos.org/centos-7/7/os/x86_64/
Mirror on Sync: No
GPG Key: RPM-GPG-KEY-CentOS-7
Name: CentOS 7 Updates x86_64
Description: Centos OS 7 Update repository
Type: yum
Restrict to Architecture: x86_64
Upstream URL : http://mirror.centos.org/centos-7/7/updates/x86_64/
Mirror on Sync: No
GPG Key: RPM-GPG-KEY-CentOS-7
Name: CentOS 7 Extra x86_64
Description: Centos OS 7 Extra repository
Type: yum
Restrict to Architecture: x86_64
Upstream URL : http://mirror.centos.org/centos-7/7/extras/x86_64/
Mirror on Sync: No
GPG Key: RPM-GPG-KEY-CentOS-7
Name: Storage x86 64
Description: Centos OS repository
Type: yum
Restrict to Architecture: x86_64
Upstream URL : http://mirror.centos.org/centos-7/7/storage/x86_64/ceph-nautilus/
Mirror on Sync: No
GPG Key: RPM-GPG-KEY-CentOS-SIG-Storage
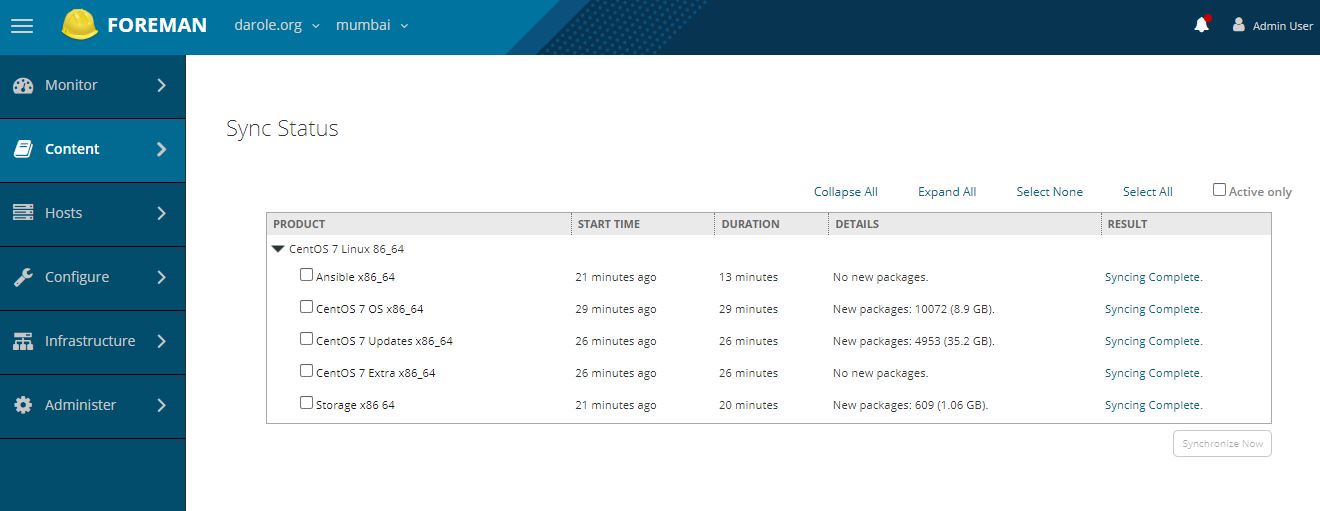
Then sync it and check sync status.
Now go to content manager and add new repositories
Publish new version.
Now let Promote to development.
Now login to development server and check the repositories.
you will able to see all repository
But on production you will see only one repository. it because we had not promoted content view to production.
Hence if anyone try to patch the production server accidently it will not work.
once the development cycle patching is completed then only, then only the contain view should be promoted to production.
now check the production server.
After that you can patch the servers.


No comments:
Post a Comment