How To Install Kubernetes On Ubuntu 18.04

What is Kubernetes ? 

Kubernetes, also known as K8s, is a popular open-source container orchestration platform that automates the deployment, scaling, and management of containerized applications. It was originally developed by Google and is now maintained by the Cloud Native Computing Foundation (CNCF).

Kubernetes provides a robust platform for running and managing containers in a production environment, with features such as automatic load balancing, rolling updates, self-healing, and scalability. It also provides a highly modular and extensible architecture that can be customized to meet the needs of different applications and infrastructure.

Kubernetes uses a declarative approach to infrastructure management, where the desired state of an application or service is defined in a manifest file and Kubernetes ensures that the actual state matches the desired state. This approach helps to simplify application deployment and management, and reduces the risk of human error.

Kubernetes is designed to work with a wide range of container runtimes, including Docker, containerd, and CRI-O. It can also integrate with a variety of cloud platforms and tools, making it a flexible and versatile platform for modern application deployment.

Before you can install Kubernetes on your Ubuntu servers, there are a few prerequisites that you need to satisfy:

  1.  Disable Swap: Kubernetes requires that swap is disabled on all nodes. You can check if swap is enabled by running the free -m command. If you see a non-zero value under the "Swap" column, you need to disable swap.
  2. Enable IP forwarding: Kubernetes requires that IP forwarding is enabled on all nodes. You can enable IP forwarding by running the command sudo sysctl net.ipv4.ip_forward=1. To make this setting persistent across reboots, you can edit the /etc/sysctl.conf file and add the line net.ipv4.ip_forward = 1.
  3. Install Docker: Kubernetes uses container technology to manage application workloads, so you need to install Docker on all nodes. You can follow the Docker installation guide for Ubuntu to install Docker on both nodes.

Once you have satisfied these prerequisites, you can proceed with the installation of Kubernetes.

In our environment, we have two Linux servers running on Ubuntu 18.04. The details for each server are as follows:

  Master Slave
Host name kub01.darole.org  kub02.darole.org
IP Address 192.168.2.230 192.168.2.231
SWAP Disabled  Disabled
CPU-Virtualization Enabled  Disabled
Number CPUs 2 1
Memory 4 GB 2 GB

Set up Docker

Step 1: Install Docker

Kubernetes requires an existing Docker installation. If you already have Docker installed, skip ahead to Step 2.If you do not have Kubernetes, install it by following these steps:

1. Update the package list with the command:

# sudo apt-get update

2. Next, install Docker with the command:

# sudo apt-get install docker.io

3. Repeat the process on slave node.

4. Check the installation (and version) by entering the following:

# docker ––version

Step 2: Start and Enable Docker

1. Set Docker to launch at boot by entering the following:

# sudo systemctl enable docker

2. Verify Docker is running:

# sudo systemctl status docker

To start Docker if it’s not running:

# sudo systemctl start docker

3. Repeat the process on slave node.

Install Kubernetes

Step 3: Add Kubernetes Signing Key
Since you are downloading Kubernetes from a non-standard repository, it is essential to ensure that the software is authentic. This is done by adding a signing key.

1. Enter the following to add a signing key:
# curl -s https://packages.cloud.google.com/apt/doc/apt-key.gpg | sudo apt-key add

2. Repeat the process on slave node.

Step 4: Add Software Repositories
Kubernetes is not included in the default repositories. To add them, enter the following:

# sudo apt-add-repository "deb http://apt.kubernetes.io/ kubernetes-xenial main"

Repeat the process on slave node.

Step 5: Kubernetes Installation Tools

Kubeadm (Kubernetes Admin) is a tool that helps initialize a cluster. It fast-tracks setup by using community-sourced best practices. Kubelet is the work package, which runs on every node and starts containers. The tool gives you command-line access to clusters.

1. Install Kubernetes tools with the command:

# sudo apt install -y kubeadm=1.21.1-00 kubelet=1.21.1-00 kubectl=1.21.1-00

Allow the process to complete.

2. Verify the installation with:

# kubeadm version

3. Repeat the process on slave node.

Note: Make sure you install the same version of each package on each machine. Different versions can create instability. Also, this process prevents apt from automatically updating Kubernetes. 

Kubernetes Deployment

Step 6: Begin Kubernetes Deployment

Start by disabling the swap memory on each server:

# sudo swapoff –a

Step 7: Initialize Kubernetes on Master Node

Switch to the master server node, and enter the following:

# sudo kubeadm init --apiserver-advertise-address=192.168.2.230 --pod-network-cidr=192.168.0.0/16 --ignore-preflight-errors=NumCPU

Once this command finishes, it will display a kubeadm join message at the end. Make a note of the whole entry. This will be used to join the worker nodes to the cluster.

Next, enter the following to create a directory for the cluster:

# mkdir -p $HOME/.kube

# cp -i /etc/kubernetes/admin.conf $HOME/.kube/config

# sudo chown $(id -u):$(id -g) $HOME/.kube/config

Step 8: Deploy Pod Network to Cluster
A Pod Network is a way to allow communication between different nodes in the cluster. 

Enter the following:

# kubectl create -f https://raw.githubusercontent.com/projectcalico/calico/v3.25.0/manifests/tigera-operator.yaml

# kubectl create -f https://raw.githubusercontent.com/projectcalico/calico/v3.25.0/manifests/custom-resources.yaml

Allow the process to complete.

Verify that everything is running and communicating:

# kubectl get pods --all-namespaces

Step 9: Join Worker Node to Cluster
As indicated in Step 7, you can enter the kubeadm join command on each worker node to connect it to the cluster.
Switch to the kube02 system and enter the command you noted from Step 7:

# kubeadm join 192.168.2.230:6443 --token 0j3u35.nmyq6h08o7wvwuwj --discovery-token-ca-cert-hash sha256:32d1d2101e05302ee5003209a679defbf55fdb7eec5c205e5889529053d78b50

Replace the alphanumeric codes with those from your master server. Repeat for each slave node on the cluster. Wait a few minutes; then you can check the status of the nodes.

Switch to the master server, and enter:

# kubectl get nodes  

The system should display the worker nodes that you joined to the cluster.

Task 1: Deploying NGINX on a Kubernetes Cluster 

We will run this deployment from the master-slave node.

Let’s begin by checking the status of the cluster. All your nodes should be in a READY state.

root@kub01:~# kubectl get nodes

 We create a deployment of NGINX using the NGINX image.

root@kub01:~# kubectl create deployment nginx --image=nginx

deployment.apps/nginx created

root@kub01:~#

You can now see the state of your deployment.

root@kub01:~# kubectl get deployments 

You can now see the pods deployed 

root@kub01:~# kubectl get pods 

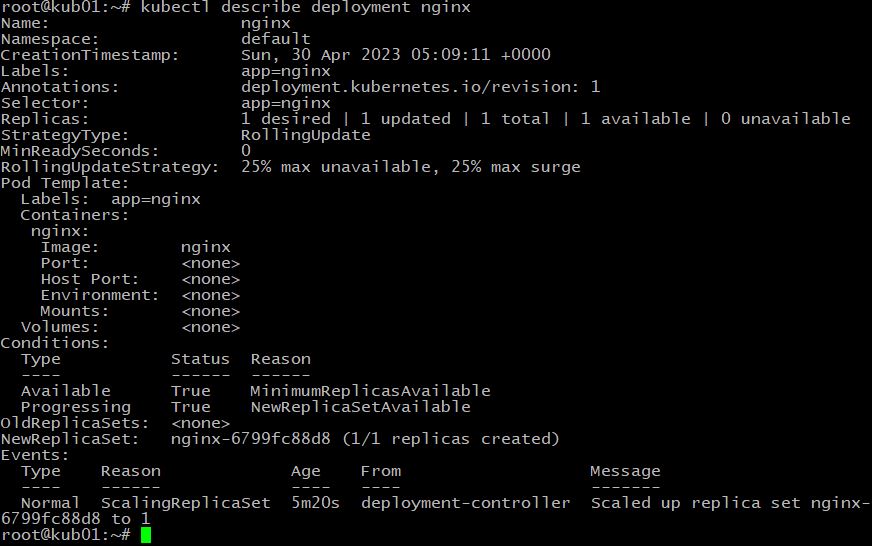
If you’d like to see more detail about your deployment, you can run the describe command. For example, it is possible to determine how many replicas of the deployment are running. In our case, we expect to see a replica of 1 running (i.e 1/1 replicas).

 root@kub01:~# kubectl describe deployment nginx 


Now your Nginx deployment is active, you may want to expose the NGINX service to a public IP reachable on the internet.

Exposing Your Nginx Service to Public Network

Kubernetes offers several options when exposing your service based on a feature called Kubernetes Service-types and they are:
ClusterIP – This Service-type generally exposes the service on an internal IP, reachable only within the cluster, and possibly only within the cluster-nodes.
NodePort – This is the most basic option of exposing your service to be accessible outside of your cluster, on a specific port (called the NodePort) on every node in the cluster. We will illustrate this option shortly.
LoadBalancer – This option leverages on external Load-Balancing services offered by various providers to allow access to your service. This is a more reliable option when thinking about high availability for your service, and has more feature beyond default access.
ExternalName – This service does traffic redirect to services outside of the cluster. As such the service is thus mapped to a DNS name that could be hosted out of your cluster. It is important to note that this does not use proxying.

The default Service-type is ClusterIP.

In our scenario, we want to use the NodePort Service-type

root@kub01:~# kubectl create service nodeport nginx --tcp=80:80

service/nginx created

Run the get svc command to see a summary of the service and the ports exposed.

root@kub01:~# kubectl get svc

Now you can verify that the Nginx page is reachable on all nodes using the curl command.
root@kub01:~# curl 192.168.2.230:31520

root@kub01:~# curl 192.168.2.231:31520

As you can see, the “WELCOME TO NGINX!” page can be reached.

Task 2: Change the index.html page on the NGINX pods.

First, let's get information on the pods:

root@kub01:~# kubectl get pods 

Next, we'll login to the pod:

root@kub01:~# kubectl exec -ti nginx-6799fc88d8-npwc8 -- bash

Then, we'll edit the index.html file on the container:

root@nginx-6799fc88d8-npwc8:/# echo "Welcome to Darole.org" > /usr/share/nginx/html/index.html

Finally, you can verify the updated Nginx page using the curl command:

root@kub01:~# curl 192.168.2.230:31520

Task 3: Change the replicas from 1 to 3.

First, let's get information on the pods:

root@kub01:~# kubectl get pod

 
Next, let's get details on the deployments:

root@kub01:~# kubectl get deployments

 
Now, we'll edit the deployment and change the replicas from 1 to 3:
 
root@kub01:~# kubectl edit deployments nginx
 
 
After making the changes, we need to check the deployments:
 
We should also check the pods to ensure that they have been scaled up:
 
 
Finally, we can verify the updated web page using the curl command:

root@kub01:~# curl 192.168.2.230:31520

Task4 : Deleting a single pod from 3 replicas.

First, let's get information about the pods:

root@kub01:~# kubectl get pods   

 
Next, we will perform the changes on the highlighted pod.
 
Login to the first pod highlighted above:
 
root@kub01:~# kubectl exec -ti nginx-6799fc88d8-4zfxh -- bash
 
Make changes to the index.html page.
 
root@nginx-6799fc88d8-4zfxh:/# echo "Welcome to Vallabh Darole kubernetes" > /usr/share/nginx/html/index.html
 

 root@kub01:~# curl 192.168.2.230:31520

Since we had done the changes on first pod (ie: nginx-6799fc88d8-4zfxh ) we want to the change hence we will delete the pod on which we had perfromed the changes.  

root@kub01:~# kubectl delete pod nginx-6799fc88d8-4zfxh

The output should show that the pod was deleted:

pod "nginx-6799fc88d8-4zfxh" deleted

Check the web pages again. you will see the default webpage

root@kub01:~# curl 192.168.2.230:31520  

 
Task 5:  Checking the logs of pods 
 
First let's get the pods information:
 
root@kub01:~# kubectl get pods  
 

Next, we will check the logs of pod
 
root@kub01:~# kubectl logs nginx-6799fc88d8-d44d2
 

You can also use additional options to customize the log output, such as:
 
-f: Follow the logs in real-time (like tail -f).
-n: Specify the namespace of the pod.
--since: Only show logs since a certain time (e.g. --since=10m for the last 10 minutes).
--tail: Only show the last N lines of logs (e.g. --tail=100 for the last 100 lines).
 
For example, to get the logs of a pod named my-pod in the default namespace:
 
root@kub01:~# kubectl logs nginx-6799fc88d8-d44d2 -n default
 
Or to follow the logs in real-time:
 
root@kub01:~# kubectl logs -f nginx-6799fc88d8-d44d2
 
Task 6: Delete the deployment and services. 
 
First let's get the deployment information:
 
root@kub01:~# kubectl get deployment  


Next, let's get service information.
 
root@kub01:~# kubectl get service
 
 
Delete the deployments 

root@kub01:~# kubectl delete deployment nginx

deployment.apps "nginx" deleted

root@kub01:~#

Delete the services 

root@kub01:~# kubectl delete service nginx

service "nginx" deleted

root@kub01:~#

 
Task 7 : Deploying NGINX on a Kubernetes Cluster using yaml file. 

Create a file name nginx.yaml with below details.

root@kub01:~# cat nginx.yaml

apiVersion: apps/v1

kind: Deployment

metadata:

  name: nginx-deployment

  labels:

    app: nginx

spec:

  replicas: 3

  selector:

    matchLabels:

      app: nginx

  template:

    metadata:

      labels:

        app: nginx

    spec:

      containers:

      - name: nginx

        image: nginx:latest

        ports:

        - containerPort: 80

root@kub01:~#

Deploy the file using below command. 

root@kub01:~# kubectl create -f nginx.yaml

deployment.apps/nginx-deployment created

root@kub01:~#

Verify the procedure, by listing the pods:

# kubectl get pods

You have successfully deployed nginx on Kubernetes!!

We need to create a nodeport service for our nginx deployment, run the following command:

root@kub01:~# kubectl create service nodeport nginx --tcp=80:80

Note down the Nodeport port, in this case 32256 for this service by running the command. In your case it will be different:

root@kub01:~# kubectl get service


***************************************************************************
kind: Pod                              
apiVersion: v1                     
metadata:                           
  name: testpod                  
spec:                                    
  containers:                      
    - name: c00                     
      image: ubuntu              
      command: ["/bin/bash", "-c", "while true; do echo Hello-Darole.org; sleep 5 ; done"]
  restartPolicy: Never         # Defaults to Always

kubectl apply -f pod1.yml

************************************************************************************************************************************

MULTI CONTAINER POD ENVIRONMENT 

kind: Pod
apiVersion: v1
metadata:
  name: testpod3
spec:
  containers:
    - name: c00
      image: ubuntu
      command: ["/bin/bash", "-c", "while true; do echo Centos4U; sleep 5 ; done"]
    - name: c01
      image: ubuntu
      command: ["/bin/bash", "-c", "while true; do echo Hello-Darole.org; sleep 5 ; done"]


*********************************************************************************************************************************
POD ENVIRONMENT  VARIABLES

kind: Pod
apiVersion: v1
metadata:
  name: environments
spec:
  containers:
    - name: c00
      image: ubuntu
      command: ["/bin/bash", "-c", "while true; do echo Hello-Darole.org; sleep 5 ; done"]
      env:                        # List of environment variables to be used inside the pod
      - name: MYNAME
        value: Darole.org

************************************************************************************************************************************
POD WITH PORTS

kind: Pod
apiVersion: v1
metadata:
  name: testpod4
spec:
  containers:
    - name: c00
      image: httpd
      ports:
       - containerPort: 80  

********************END*************************************************

The Nautilus DevOps team want to create a time check pod in a particular Kubernetes namespace and record the logs. This might be initially used only for testing purposes, but later can be implemented in an existing cluster. Please find more details below about the task and perform it.
1. Create a pod called time-check in the xfusion namespace. This pod should run a container called time-check, container should use the busybox image with latest tag only and remember to mention tag i.e busybox:latest.
2. Create a config map called time-config with the data TIME_FREQ=2 in the same namespace.
3. The time-check container should run the command: while true; do date; sleep $TIME_FREQ;done and should write the result to the location /opt/itadmin/time/time-check.log. Remember you will also need to add an environmental variable TIME_FREQ in the container, which should pick value from the config map TIME_FREQ key.
4. Create a volume log-volume and mount the same on /opt/itadmin/time within the container.

Note: The kubectl utility on jump_host has been configured to work with the kubernetes cluster.

1. Write the manifest to create namespace.
thor@jump_host ~$ cat xfusion-namespace.yaml 
apiVersion: v1
kind: Namespace
metadata:
  name: xfusion

2. Check the status
thor@jump_host ~$ kubectl get namespaces
NAME                 STATUS   AGE
default              Active   85m
kube-node-lease      Active   85m
kube-public          Active   85m
kube-system          Active   85m
local-path-storage   Active   85m

3. Create namespace
thor@jump_host ~$ kubectl apply -f xfusion-namespace.yaml 
namespace/xfusion created

4. Check the status
thor@jump_host ~$ kubectl get namespaces
NAME                 STATUS   AGE
default              Active   85m
kube-node-lease      Active   85m
kube-public          Active   85m
kube-system          Active   85m
local-path-storage   Active   85m
xfusion              Active   5s
thor@jump_host ~$ 

5. Write the manifest to create pod and volumes.
thor@jump_host ~$ cat time-check.yml 
apiVersion: v1
kind: ConfigMap
metadata:
  name: time-config
  namespace: xfusion
data:
  TIME_FREQ: "2"
---
apiVersion: v1
kind: Pod
metadata:
  name: time-check
  namespace: xfusion
spec:
  containers:
  - name: time-check
    image: busybox:latest
    command: ["/bin/sh", "-c", "while true; do date; sleep $TIME_FREQ; done >> /opt/itadmin/time/time-check.log"]
    env:
    - name: TIME_FREQ
      valueFrom:
        configMapKeyRef:
          name: time-config
          key: TIME_FREQ
    volumeMounts:
    - name: log-volume
      mountPath: /opt/itadmin/time
  volumes:
  - name: log-volume
    emptyDir: {}

6. Check the pod status
thor@jump_host ~$ kubectl get pods -n xfusion
No resources found in xfusion namespace.

7. Create the pod
thor@jump_host ~$ kubectl apply -f time-check.yml 
configmap/time-config created
pod/time-check created

8. Check the pod status
thor@jump_host ~$ kubectl get pods -n xfusion
NAME         READY   STATUS    RESTARTS   AGE
time-check   1/1     Running   0          5s
thor@jump_host ~$ 

9. Check the pod details status
thor@jump_host ~$ kubectl describe pod -n xfusion time-check
Name:             time-check
Namespace:        xfusion
Priority:         0
Service Account:  default
Node:             kodekloud-control-plane/172.17.0.2
Start Time:       Tue, 19 Mar 2024 16:36:40 +0000
Labels:           <none>
Annotations:      <none>
Status:           Running
IP:               10.244.0.5
IPs:
  IP:  10.244.0.5
Containers:
  time-check:
    Container ID:  containerd://82b78abcaec3ad70a3f51e78d001e19f41eb1338d1d345202fe47627893156ca
    Image:         busybox:latest
    Image ID:      docker.io/library/busybox@sha256:650fd573e056b679a5110a70aabeb01e26b76e545ec4b9c70a9523f2dfaf18c6
    Port:          <none>
    Host Port:     <none>
    Command:
      /bin/sh
      -c
      while true; do date; sleep $TIME_FREQ; done >> /opt/itadmin/time/time-check.log
    State:          Running
      Started:      Tue, 19 Mar 2024 16:36:43 +0000
    Ready:          True
    Restart Count:  0
    Environment:
      TIME_FREQ:  <set to the key 'TIME_FREQ' of config map 'time-config'>  Optional: false
    Mounts:
      /opt/itadmin/time from log-volume (rw)
      /var/run/secrets/kubernetes.io/serviceaccount from kube-api-access-pqjwp (ro)
Conditions:
  Type              Status
  Initialized       True 
  Ready             True 
  ContainersReady   True 
  PodScheduled      True 
Volumes:
  log-volume:
    Type:       EmptyDir (a temporary directory that shares a pod's lifetime)
    Medium:     
    SizeLimit:  <unset>
  kube-api-access-pqjwp:
    Type:                    Projected (a volume that contains injected data from multiple sources)
    TokenExpirationSeconds:  3607
    ConfigMapName:           kube-root-ca.crt
    ConfigMapOptional:       <nil>
    DownwardAPI:             true
QoS Class:                   BestEffort
Node-Selectors:              <none>
Tolerations:                 node.kubernetes.io/not-ready:NoExecute op=Exists for 300s
                             node.kubernetes.io/unreachable:NoExecute op=Exists for 300s
Events:
  Type    Reason     Age   From               Message
  ----    ------     ----  ----               -------
  Normal  Scheduled  39s   default-scheduler  Successfully assigned xfusion/time-check to kodekloud-control-plane
  Normal  Pulling    38s   kubelet            Pulling image "busybox:latest"
  Normal  Pulled     37s   kubelet            Successfully pulled image "busybox:latest" in 1.631942363s (1.63195789s including waiting)
  Normal  Created    36s   kubelet            Created container time-check
  Normal  Started    36s   kubelet            Started container time-check

10. Check the time-check.log
thor@jump_host ~$ kubectl exec -it time-check -n xfusion -- cat /opt/itadmin/time/time-check.log
Tue Mar 19 16:36:43 UTC 2024
Tue Mar 19 16:36:45 UTC 2024
Tue Mar 19 16:36:47 UTC 2024
Tue Mar 19 16:36:49 UTC 2024


Kubernetes : Kubernetes Shared Volumes
Date 11:43 AM 6/18/2024
We are working on an application that will be deployed on multiple containers within a pod on Kubernetes cluster. There is a requirement to share a volume among the containers to save some temporary data. The Nautilus DevOps team is developing a similar template to replicate the scenario. Below you can find more details about it.
1. Create a pod named volume-share-xfusion.
2. For the first container, use image debian with latest tag only and remember to mention the tag i.e debian:latest, container should be named as volume-container-xfusion-1, and run a sleep command for it so that it remains in running state. Volume volume-share should be mounted at path /tmp/official.
3. For the second container, use image debian with the latest tag only and remember to mention the tag i.e debian:latest, container should be named as volume-container-xfusion-2, and again run a sleep command for it so that it remains in running state. Volume volume-share should be mounted at path /tmp/apps.
4. Volume name should be volume-share of type emptyDir.
5. After creating the pod, exec into the first container i.e volume-container-xfusion-1, and just for testing create a file official.txt with any content under the mounted path of first container i.e /tmp/official.
6. The file official.txt should be present under the mounted path /tmp/apps on the second container volume-container-xfusion-2 as well, since they are using a shared volume.

Note: The kubectl utility on jump_host has been configured to work with the kubernetes cluster.

thor@jumphost ~$ vi volume-share-xfusion.yaml
apiVersion: v1
kind: Pod
metadata:
  name: volume-share-xfusion
spec:
  containers:
  - name: volume-container-xfusion-1
    image: debian:latest
    command: ["sleep", "infinity"]
    volumeMounts:
    - name: volume-share
      mountPath: /tmp/official
  - name: volume-container-xfusion-2
    image: debian:latest
    command: ["sleep", "infinity"]
    volumeMounts:
    - name: volume-share
      mountPath: /tmp/apps
  volumes:
  - name: volume-share
    emptyDir: {}

thor@jumphost ~$ kubectl apply -f volume-share-xfusion.yaml 
pod/volume-share-xfusion created
thor@jumphost ~$ kubectl get pods
NAME                   READY   STATUS    RESTARTS   AGE
volume-share-xfusion   2/2     Running   0          10s
thor@jumphost ~$

thor@jumphost ~$ kubectl exec -it volume-share-xfusion -c volume-container-xfusion-1 -- /bin/bash
root@volume-share-xfusion:/# echo "This is a test file created by Vallabh 11:52" > /tmp/official/official.txt
root@volume-share-xfusion:/# exit
exit
thor@jumphost ~$ kubectl exec -it volume-share-xfusion -c volume-container-xfusion-2 -- /bin/bash

root@volume-share-xfusion:/tmp/apps# cat /tmp/apps/official.txt 
This is a test file created by Vallabh 11:52
root@volume-share-xfusion:/tmp/apps# exit
exit
thor@jumphost ~$ 

No comments:

Post a Comment